A new video is available on my YouTube channel: Nullable Reference Types and Null Operators in C#. The video is a quick walkthrough of code based on a series of articles I
did last year (links below).
Nullable Reference Types and Null Operators in C#
New projects in C# have nullable reference types enabled by default. This
helps make the intent of our code more clear, and we can catch potential
null references before they happen. But things can get confusing,
particularly when migrating existing projects. In this video, we will look
at the safeguards that nullability provides as well as the problems we still
need to watch out for ourselves. In addition, we will learn about the
various null operators in C# (including null conditional, null coalescing,
and null forgiving operators). These can make our code more expressive and
safe.
The code shows an existing application that can get a null reference exception
at runtime. Then we enable nullable reference types to see what that feature
does and does not do for us. Then we walk through the potential null warnings
and use the various null operators to take care of them.
All in under 13 minutes!
The video is based on a series of articles. If you prefer text (or just want
more detail), you can take a look at these:
C# integers overflow by default, meaning if you go past the biggest value of
the integer it will wrap to the smallest value. In this video, we will look
at how we can turn this behavior into an error by using a "checked"
statement, a project-level setting, or a "checked" expression.
This is a fairly quick topic -- just 4 minutes for the basics and a few more
minutes of bonus content.
Let me know if you like the format (or not) by dropping a note in the
comments. I am planning on refreshing some of the older topics as well as
covering a few new ones.
If you find this video helpful, be sure to pass it along.
2020 was "interesting". One good thing that came out of it is that I had the
chance to speak remotely for some user groups and conferences that I would not
normally get to attend in person. Many of those presentations were recorded.
Here's a list for anyone who is interested
Abstraction is awesome. And abstraction is awful. Too little, and our
applications are difficult to extend and maintain. Too much, and our
applications are difficult to extend and maintain. Finding the balance is the
key to success. The first step is to identify your natural tendency as an
under-abstractor or an over-abstractor. Once we know that, we can work on
real-world techniques to dial in the level of abstraction that is "just right"
for our applications.
There's a lot of confusion about async/await, Task/TPL, and asynchronous and
parallel programming in general. So let's start with the basics and look at
how we can consume asynchronous methods using Task and then see how the
"await" operator can makes things easier for us. Along the way, we’ll look at
continuations, cancellation, and exception handling.
What does a banjo have to do with software development? They both require
learning. And picking up a banjo later in life showed me 3 things that I've
brought into my developer life. (1) You can learn; a growth mindset removes
blockages. (2) You don't have to be afraid to ask for help; experienced
banjoists/developers can point you in the right direction. (3) You don't have
to be perfect before you share what you've learned; it's okay to show what you
have "in progress". In combination, these have made me a better banjo player
and a better developer.
There's a lot of confusion about async/await, Task/TPL, and asynchronous and
parallel programming in general. So let's start with the basics and look at
how we can consume asynchronous methods using Task and then see how the
"await" operator can makes things easier for us. Along the way, we’ll look at
continuations, cancellation, and exception handling.
C# 8 brings new features to interfaces, including default implementation,
access modifiers, and static members. We'll look at these new features and see
where they are useful and where they should be avoided. With some practical
tips, "gotchas", and plenty of examples, we'll see how to use these features
effectively in our code.
C# 8 brings new features to interfaces, including default implementation,
access modifiers, and static members. We'll look at these new features and see
where they are useful and where they should be avoided. With some practical
tips, "gotchas", and plenty of examples, we'll see how to use these features
effectively in our code.
I'll Get Back to You: Task, Await, and Asynchronous Methods in C# (Aug 2020)
Code PaLOUsa
There's a lot of confusion about async/await, Task/TPL, and asynchronous and
parallel programming in general. So let's start with the basics and look at
how we can consume asynchronous methods using Task and then see how the
"await" operator can makes things easier for us. Along the way, we’ll look at
continuations, cancellation, and exception handling.
Delegates are the gateway to functional programming. So let's understand delegates and how we can change the way we program by using functions as parameters, return types, variables, and properties. In addition, we'll see how the built in delegate types, Func and Action, are waiting to make our lives easier. By the time we're done, we'll see how delegates can add elegance, extensibility, and safety to our programming. And as a bonus, you'll have a few functional programming concepts to take with you.
I have a few more recordings from 2021 presentations, and I'll post those soon. As always, if you'd like me to visit your user group, drop me a line. I'll see what I can do about being there online or in person (once in-person stuff is a bit more back to normal).
I had a great time speaking at NDC London back in January. I wrote a bit about it soon after the event.
The good news is that the recordings of my presentations are now available. So if you missed the event (or just want to experience the talk again), here's your chance.
And if you'd like to see more from NDC London, keep an eye on their YouTube channel playlist: Playlist: NDC London.
Get Func-y: Delegates in .NET
Watch it on YouTube, or watch it here:
Focus on the User: Making the World a Better Place
Watch it on YouTube, or watch it here:
My schedule is filling up for the rest of the year. I'm looking forward to lots of events and meeting lots of great people.
Today I had the opportunity to talk with Steve Bishop on his YouTube channel. Steve gave me the chance to show some code and talk about using TDD in a real-world scenario -- in this case, creating a class that gets data from a service.
The code is taken from a talk (and hopefully soon-to-be-produced video series) which shows a few of my struggles with adopting TDD. It's easy to get stuck when we try to do things in a particular order. There are certain things that are difficult to unit test, and sometimes we need to skip over them and get on to other things.
The code download has 3 states: (1) the starting code (if you'd like to follow along), (2) the "minimal" completion state, which is how we left the code at the end of this video (more or less), and (3) a fully-completed state that has all of the methods and has been refactored into a few different classes. This is just one option for completing the task. The specifics always depend on the needs of our particular application.
Also, if you'd like to take a closer look at exception handling (as mentioned in the video), take a look at this video on my channel: TDD Debugging and Testing Exceptions.
A big thanks to Steve for hosting me on his show. I'll look forward to doing it again in the future.
Scott Nimrod (@Bizmonger) and I had a conversation earlier this week. We talked about a number of things, including living as an introvert, code quality, developer ego, and functional programming. It was a pretty long conversation (close to 2 hours), but we shared some great ideas.
I met Scott at NDC London back in January, but I first heard from him in September last year when he left a comment on the .NET Rocks episode that I was on: Becoming a Social Developer with Jeremy Clark. I still remember Carl Franklin coming up to me at NDC London and saying that I needed to meet Scott.
We just had a brief conversation then (and we've had some Twitter chats since then), but it was great to talk at length this week. If you'd like to share in two developers talking about stuff, then be sure to take a listen.
I've had a few people ask me about recording live presentations recently, so now's a good time to talk about how I do it.
I've been recording my presentations for about a year and a half now. There are a couple of reasons why I've wanted to record myself speaking:
By watching myself, I can learn my quirks that I don't notice. This helps me improve my speaking technique.
I can put together clips of me speaking to create a promo video to help get me more speaking opportunities. (I never did this because I had some great professionally recorded videos to showcase before I got around to completing it.)
I can post recordings that come out well to my YouTube channel.
I have fully-produced two talks so far. This is from April 2016 (Central California .NET User Group, Fresno CA):
And this is from March 2015 (Nebraska.Code(), Lincoln NE):
So here's what I've done. It's not professional quality, but it gets the job done for what I was looking for.
Sound Quality is King
One of the most important things about recording live presentations is making sure that you have good audio. If there is echo-y sound that's hard to understand, no one will watch the video. I've passed up watching videos of people I really wanted to hear just because the audio was so distracting. This problem actually kept me from recording my presentations for quite a while.
For a previous discussion on the importance of audio quality, check out my article on screencasting: Jeremy's Screencast Production.
Record Audio Separately
Don't rely on the camera or your computer to pick up the audio. Record the audio separately. I use a Zoom H1 digital recorder (Amazon link) that I'm very happy with:
This has a built-in microphone array which would be good for recording interviews or something where you don't move around a lot. For my presentations, I pair this with a Sony ECMSC3 lapel microphone (Amazon link):
This is an inexpensive microphone, but the quality is surprisingly good. I can clip the microphone to my collar and stick the Zoom recorder in my pocket.
Note: If you take this approach, make sure the microphone is plugged in all the way to the recorder. I have a couple presentations that are nothing but a recording of the inside of my pocket.
What I Like
I am happy with the results of the Zoom recorder. It runs on AA batteries and records to a micro-SD card. Battery life is very good, and 2-1/2 hours of audio takes about 1-1/2 gigs of space (which isn't much when you can buy 64 gig cards really cheaply).
I use the "Auto Level" feature of the Zoom recorder (you can see the switches on the back). This has a few quirks, but it's easy to fix in editing (more on that below).
You'll also notice that there is a "Hold" switch. This will save you from accidental button presses, particularly if you put the recorder in your pocket.
Repeat the Question
A general piece of speaker advice is to always repeat the question so that other members of the audience can hear it. This is especially important when recording because you will not pick up the audience at all on the lapel microphone. So you want to repeat the question for the recording as well.
Screen Capture
I use Camtasia Recorder (from TechSmith) for screen capture. I've spent a bit of time talking about Camtasia in my screencasting article, so I won't repeat it here. I'll have a bit more to say about it when we get to editing.
One thing to be aware of is that the Camtasia Recorder will capture some keystrokes for its own use. So be prepared to re-map some keys in Camtasia or be ready to use alternate methods in your demo. The most prominent one that I run into is that F10 is "pause" for Camtasia, so in Visual Studio, I'll use the toolbar buttons for debugging instead of F10 to step through code.
Video
High-quality video was not really important to me. I primarily wanted to be able to see myself in action (and again, potentially put together a promo video). Rather than spend a lot of money on a video camera, I spent a couple hundred dollars on a little Sony HDR-AS100V (Amazon link):
This is the Sony version of a GoPro. It's really designed as an action camera, so the lens is a bit fish-eyed. I got this a while back, so I'm sure there's an improved version of this now.
The recording quality is good: 1080p. And if you crop the video (like is shown in the first video in this article), then you don't see the fish-eye. Note: the second video in the article was actually recorded first, and I learned some things about editing that I was able to use in the other video. But more on editing later.
I have the camera mounted on a small tripod (this was included with the Zoom kit that is linked above):
It's nice and small to stick in a bag with the other gear. But the legs expand to give it a decent height when placed on a table. Here's the rig with the camera attached:
I usually put the camera on a table in the front row (which gives a bit of a side-angle). I've put it in the back of the room a few times, and the image was a bit small. When it's closer, it's easier to see my movement and mannerisms.
What to Watch Out For
There are a couple things about this camera to watch out for. First, it can only be charged by the USB port (there's a removable battery, but you would have to buy a separate charger for that). It cannot be plugged in and record at the same time, so you're limited by battery life.
In my experience, battery will go about 1 hour 45 minutes. This can usually accommodate one of my presentations at a user group, but I make sure to start it just before I start, and I'll even pause it at breaks to save a bit of battery.
This also uses micro-SD for storage. And it runs about 4 gigs for 35 minutes of video. I use those weird increments because it actually splits up video files into 35 minute chunks. Again, with a 64 gig card, I've never had any problems with space. The limiting factor has always been battery life.
Audio Everywhere Record audio in all three places: digital recorder, screen capture, and video camera. Even though the final audio will be from the digital recorder, it's easy to use the sound waves to line up the various tracks when editing the video.
And here's a tip I picked up from my friend and fellow speaker Justin James (@digitaldrummerj):
After starting all 3 recorders, clap your hands.
This will create a very visible audio spike that you can use to line up the various tracks. (Just like movies use the clappers to start a take.)
Lots of Files
The result of the recordings are lots of files:
The ".mp4" files come from the video camera. As mentioned, this records in 35 minute chunks, so these need to be put together in editing. The ".trec" file is the screen capture from Camtasia. And the ".wav" file comes from the Zoom audio recorder.
The ".camproj" file is the Camtasia project. We're headed there next.
Putting Everything Together
Now that we've got all of the sources, we need to put everything together in Camtasia Studio. First job is laying down the tracks and lining them up. This is where the audio helps A LOT.
First, here's a look at the Camtasia interface:
The order of the tracks are important, the track that is "on top" (in this case, Track 4) appears over any other tracks.
Track 1: Audio track (not visible). This comes from the Zoom digital recorder and it will be the audio that we ultimately use.
Track 2: Screen capture (left side of screen). This comes from the Camtasia Recorder.
Track 3: Video capture (right side of screen). This is from the Sony video camera.
Track 4: Overlays (text at top of screen). We'll take a closer look at this a bit later.
Lining Things Up
After getting the media in the right slots, we have to line everything up. For this, we can look at the audio for each track:
We can use the audio tracks to line everything up. Notice that the peaks line up across the media. And as noted earlier, a "clap" at the start can create a spike to make it easy to see where the start point is.
In this case, I've already trimmed down the video and audio, so we can't see that part. Once everything is lined up, you can trim the excess at the beginning and end of the tracks.
You'll see different intensities when looking at the audio, this is because the computer is one side of the room, the camera is on the opposite side, and I'm walking around with the voice recorder in the middle.
Audio Processing
After getting all of the tracks lined up, we can use the Audio tab in Camtasia to simply mute the 2 video tracks. This will leave the audio just from the Zoom recorder.
When I'm doing screencasting, I don't normally use the audio leveling tool (as mentioned previously). This is because screencast recording is in a much more controlled environment where I'm sitting still. Things are a bit different when I'm doing things live and don't get a "second take".
So I use the volume leveling tool in Camtasia:
Just select the audio track and click "Enable volume leveling". This smooths out the peaks, and the audio track now looks more like this:
This is a bit different from the audio track we saw above.
I do this to smooth out some of the "Auto Level" from the Zoom recorder (remember I mentioned that above?). The auto-leveling of the Zoom recorder generally works well, but if you cough, tap the microphone, or cause some other "spike", the recorder will lower the sound levels, and it takes a few seconds to re-adjust.
The "Auto Level" in Camtasia will correct this. It's not ideal. But I also don't have a professional audio technician doing these recordings for me. The audio still comes out a lot better than many of the "live recordings" that I come across.
Video Processing
There are a couple different approaches to take when trying to show both the screen and the person at the same time. For the April 2016 video, things were pretty easy:
This projector was had a 4x3 aspect ratio, so my screen capture had that same ratio. This made it really easy to put the screen and video side-by-side (although it does look a little strange in the beginning when I'm showing my wide-screen slides).
In contrast, in the March 2015 video, I put in a lot of edits to show the live video when that was important and to show the screen when that was important. This was *a lot* of work. It is much easier to do side-by-side or an overlay if you can get away with it.
Since the videos were side-by-side, the order of the tracks wasn't as important (since they don't overlap). But if you're overlaying or doing other interesting things, you want to make sure that the right video is "on top".
Stitching Video
As mentioned above, the Sony video camera records in 35 minute chunks, and these end up as separate files. The good news is that if you put the two media files right next to each other in Camtasia (on the same track and touching each other), there is no gap or stutter at all.
Cropping and Panning
It's possible to crop and pan inside Camtasia to show just parts of the video. Some of these features are really hard to find. For example, the "crop" button is in the top right corner of the preview window:
This is entirely non-obvious, and I haven't found the "crop" feature on another screen or menu (maybe I'm missing it).
Here's what the video looks like un-cropped:
So you can see that I cropped out quite a bit of the frame. Cropping also can make the "fish-eye" of the camera a bit less obvious. This is why having the 1080p recording is nice. Even if you don't show the video full screen, you can crop and zoom into different areas and still have decent quality output.
This video was shot at the Central California .NET User Group in Fresno, CA. It's a small group; there were 10 people there that night. But it's not always the size of the room that makes a good presentation. Sometimes the smaller groups are better because you get more questions and interaction. (And remember to "repeat the question" even in a small room. Otherwise, you'll have an audio gap in your recording.)
Callouts
The last step in the editing process is to add callouts to the video. I've talking about adding callouts in screencasts, but it's also important when showing live presentations.
Here's a good example of why:
You'll notice in the video that I'm pointing at the screen. This is pretty common for me (especially when I'm talking in a training room). But it's impossible to tell what I'm pointing at.
This is where the "Callouts" feature in Camtasia comes in handy. I can highlight the area on the screen that I'm talking about. In this case, I'm pointing to a method signature and using a red rectangle to highlight it. This is on the "top track" (Track 4 here) so that it shows up over everything else. I've added similar callouts throughout the presentation.
Rendering
After getting all the bits together, it's time to render and upload. I try to render at the highest resolution I can (which is generally 1080p). Then when I upload to YouTube, they'll process it down to lower-quality versions.
Rendering projects with live video take significantly longer than rendering screencasts. So be prepared for that. This is compounded because my screencasts are generally in 20 minute chunks and will render in about 20 minutes. But a live presentation is over an hour long, so it's both more material and also a slower render.
Make sure that your computer is well ventilated during this process.
Wrap Up
This is a lot of work. But it's not that hard to do. The equipment cost me around $500 (which isn't cheap), but I've gotten quite a bit of use out of it. The Zoom recorder in particular has been a great little tool. I'm surprised at the quality that I can get from this little plastic device. This is the recorder that I also used to record bits of my banjo playing.
I have recorded about 20 of my presentations. And I've gone through the process of laying down the tracks, lining up the audio, and rendering each of them. Most of them have just been for my personal use (so you don't see all of the work behind those). But a couple have made it out into the wild, and when I come across a good presentation, I'll be sure to post it.
If you decide to start recording and producing your own presentations, I hope that my experience will make the path a bit easier for you.
I'll be speaking at Live! 360 in Orlando, FL in December. It will be a great time. I had the chance to speak there last year, and it was a week packed with lots of great sessions, lots of great people, and a bit of fun, too.
I've got three sessions scheduled for Live! 360 Orlando in December. Check out my talks along with all the other great speakers here: Speakers - Live! 360.
If you're not convinced that this is an event you want to attend, you can get a preview by taking a look at the Live! 360 Learning Library.
If you head out there right now, you'll see me! To watch my video for FREE, just fill in your name and email address and click the "Access Now" button.
This recording is from Visual Studio Live! in Austin, TX this past May. You'll be able to see this talk (plus, tons of others) by signing up to go to Live! 360 Orlando in December.
I have a couple of events scheduled for May. And they look to be really great events.
Thursday, May 12, 2016
Agile SD
San Diego, CA Website All the Details (Flyer)
o Unit Testing Makes Me Faster: Convincing Your Boss, Your Co-Workers, and Yourself
This is my first time visiting Agile SD. It will be great to meet a new group of folks (and I'll hopefully see some familiar faces as well). Be sure to stop by if you're in the area.
Mon-Thu, May 16-19, 2016
Visual Studio LIVE!
Austin, TX Website
o Clean Code: Homicidal Maniacs Read Code, Too!
o DI Why? Getting a Grip on Dependency Injection
o Unit Testing Makes Me Faster: Convincing Your Boss, Your Co-Workers, and Yourself
Visual Studio LIVE! is a great event. This is an event that I used to attend when I was a corporate developer, and it really helped me get up to speed on technologies that became very useful in my career. I'm very excited to be a part of it now.
It's not too late to sign up. You can use code AUSPK07 to save $400 on a 4-Day Conference pass. And you'll have plenty of time to talk to me, I'll be around all week.
A Look Back
I had a really great time in April. I got to visit the San Diego .NET User Group, which is probably my most-visited group. One awesome experience happened before things got started. During the networking time, things were pretty quiet in the auditorium. So I gave my 5 minute version of "Becoming a Social Developer" and the importance of talking to other developers. And it worked! People started talking to their neighbors a few seats over or in the next row. It was great to see the group pick it up so quickly. Some people just need a nudge and permission to talk to others. Keep it up!
I also got to go to the Utah Code Camp in Salt Lake City. I had a ton of great experiences there, including some conversations that I'll be writing about later. Thanks to everyone for the great feedback from my presentations where I got to talk about Dependency Injection and Lambda Expressions -- two of my favorite topics.
A bit more locally, I spoke at Agile SoCal in Irvine, CA. This was my first time at this group, and it was great to interact with a different group of folks. Similar to my experiences at the Agile Open conference, fewer developers than most groups that I speak at. And it's great to get some different perspectives.
Finally, I took a drive up to Fresno to speak at the Central California .NET User Group. We had a great time making Task and Await a bit more understandable. After the meeting was over, I had some great conversations with folks who wanted to hang out for a bit longer.
Coming Up
June is looking to be really busy. I'll be going to Norway for NDC Oslo, heading to Kansas for the Kansas City .NET User Group, and on to KCDC in Kansas City, MO.
Other exciting stuff happening, too. I'll be posting updates on that once I've got more information.
As always, check my homepage to get the latest schedule: JeremyBytes.com. And I hope to see you at an upcoming event!
I've recently published two more videos that explore Test-Driven Development a bit more. If you're new to TDD, then you might want to start with TDD Basics in C#.
The latest videos use the rules for Conway's Game of Life as the problem to be solved. I ran across Conway's Game of Life many years ago when I was first getting involved with computers, and the patterns have intrigued me ever since.
TDD: Don't Turn Off Your Brain
Test-Driven Development (TDD) lets our code develop out of our tests. But this doesn't mean that we turn off our brain. We still need to make decisions on our design as we write our tests. In this video, we'll take some "bigger steps" with TDD to implement the rules for Conway's Game of Life. Along the way, we'll see the types of design decisions we need to keep in mind.
To continue on with the code from Conway's Game of Life, we fix some bugs and test for exceptions.
TDD Debugging & Testing Exceptions
Test-Driven Development (TDD) lets our code develop out of our tests. But it is also extremely useful when we have to debug existing code. When we have a bug, we can first write a failing unit test, then write the code to get that test to pass. In addition to debugging, in this video, we'll see how we can test for exceptions in our tests. There are several approaches with different advantages.
More videos on unit testing are on the way. Future topics will include using TDD with real-world applications, mocking, and testing asynchronous methods.
As mentioned previously, I had an awesome time at NDC London back in January. One great thing about NDC is that they record the sessions and make them available. Today, the recording of my session was posted.
I’ll Get Back to You: Task, Await, and Asynchronous Methods in C# - Jeremy Clark
There's a lot of confusion about async/await, Task/TPL, and asynchronous and parallel programming in general. So let's start with the basics and look at how we can consume asynchronous methods using Task and then see how the "await" operator can makes things easier for us. Along the way, we’ll look at continuations, cancellation, and exception handling.
This has become one of my more popular topics this year. And I've had a great response. Here are some of the comments from the Twitterverse from NDC London:
@jeremybytes thanked you in person at #ndslondon but again THANK YOU!Finally cleared up TPL async & await for me!Now to replay for my team!
The total count on the evaluation cards: 157 Green, 7 Yellow, and 0 Red.
Look for Your Chance
If you'd like to see this presentation LIVE, be sure to check out my speaking schedule. You can see my upcoming confirmed events on my homepage: www.jeremybytes.com. I have several proposals out there, so be sure to check back for updates as events are confirmed.
I've just published a new video on YouTube, this time taking a look at the basics of test-driven development. This starts at the very beginning and walks through the Red-Green-Refactor cycle to build up code one step at a time.
This video is great for developers who want to get started with TDD. The code we build is pretty simple: an implementation of FizzBuzz. In later videos, we'll take a look at unit testing and TDD with real-world code.
TDD Basic with C#
Test-Driven Development (TDD) lets our code develop out of our tests. We do this by following the Red-Green-Refactor cycle. In this video, we look at the basics of TDD by implementing FizzBuzz in C#. We'll be using NUnit as our testing framework, but these principles work with whatever environment we choose.
In my presentation "Unit Testing Makes Me Faster", I show a couple of videos that compare manual testing and unit testing. Folks have asked me to make these videos available, but they don't really make sense without context. So, we're going to look at both here.
The Method
Here's the method that we have in our code that needs to be tested:
The particulars aren't important. This method checks to see if a credit card number passes the Luhn algorithm -- basically a checksum on a credit card number. We need to make sure that this method works.
Manual Testing
Before I started unit testing, I would commonly throw together a tester application just to sanity check the algorithm. This would be a simple application with some input/output fields and a button.
In this case, I built a little WPF application (since WPF is my UI of choice these days). This application just takes a few minutes to build, and we end up with something that looks like this:
The code-behind for the button calls our method and puts the results in an output block:
To use this application, we paste our test numbers into the text box, click the button, and then check the output. This will tell us whether the "PassesLuhnCheck" method returns true or false:
Unit Testing
Building unit tests for this method is pretty simple. We just create a method to check for "true" results and a method to check for "false" results. To make things easier, we can parameterize the methods so that we can check multiple numbers.
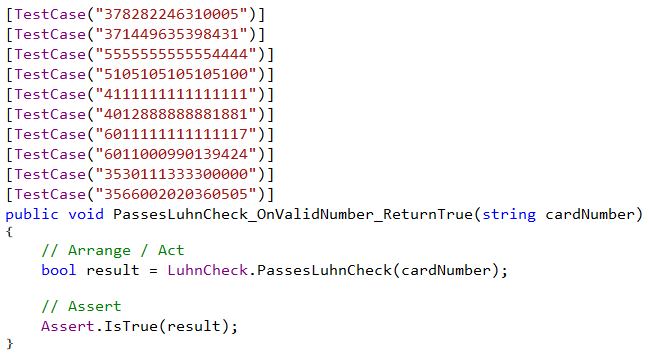
Here's our check for the numbers that should pass the Luhn check (and thus return "true"):
Because we're using parameterized tests, we can check 10 different cases with this one method.
We can do the same for the numbers that should not pass the Luhn check:
This gives us 5 more test cases that should all return "false".
Build Comparison
And this takes us to the comparison videos. In the first video, we show side-by-side building the tester application and implementing the unit tests. This starts from scratch (File -> New Project) for both options.
So that we don't have to wait too long, this video is sped up 3 times faster than normal:
What this shows is that when we're comfortable with our tools, it takes about the same amount of time to build either test solution -- about 5 minutes in this case.
There is a big caveat there: when we're comfortable with our tools.
In my case, I am comfortable with WPF XAML and with unit testing using NUnit. If I did not know WPF, then I would expect that building the tester application would take me a bit longer. In the same way, if I were new to unit testing and NUnit, I would expect that building the unit tests would take me a bit longer.
But if I'm comfortable in both environments, then we get a fair comparison between these solutions.
The build times may be similar, but we see a real difference when we look at regression testing.
Regression Comparison
Regression testing is when we make sure that we didn't break any existing functionality in the code. It's a bit hard to tell in the above video, but we do have some failing tests. If the input contains a non-numeric (such as a letter or a minus sign), then the method we're testing throws an exception.
Our job is to fix the method so that our tests will pass (without throwing exceptions), and then we need to go back and check that we didn't break the existing functionality.
This video shows a side-by-side comparison of fixing the problem and then running regression tests. This video is *not* sped up; it is real time:
This is where we see a huge difference. With our unit tests in place, after we make the change to our code, we simply build and re-run the tests. The tests take 3 seconds to run. We get confirmation that our changes fixed the problem and also that we didn't break the existing functionality.
For the manual test application, we need to go through our test cases and copy/paste them into the application and click the button. This only takes about a minute to do. But even so, it's painful to watch. If you watch closely, you'll see that the unit tests are complete before we have a chance to check the first value manually.
The real question is which type of regression are we most likely to do? If the tests run automatically in 3 seconds, then I'm going to be running those tests all day long. If I have to go through a manual process of copy/paste and clicking, then I'm never going to do that.
Wrap Up
Doing side-by-side comparisons of various testing methods can give us a good idea of where the advantages lie. Granted, it takes time to get up-to-speed on unit testing, but that's no different from any other framework. And there are many other advantages to having automated tests in place as well. Check out the materials for some more information: Unit Testing Makes Me Faster.
Git can be a bit of a stumbling block for Visual Studio developers. That's because we're generally used to centralized source control systems like TFS. In addition, there seems to be an emphasis on using command line tools to interact with Git repositories. Because of these differences, we often put off learning Git because it seems like it will be a lot of effort.
But in reality, with just a few key commands and the tools built in to Visual Studio, we can get started with Git very quickly. And that's what I show in my latest video -- along with some GitHub hints as well.
I've been using Git for less than a year, and I'm completely sold. I love having the complete repository on my machine. That means I get full history, branching, and roll-back capabilities without being connected to a central server. I'm not an expert, but I'll help you get started.
Cancellation gets a bit tricky because we end up passing around a cancellation token. But there's a problem: if we create a cancellation token directly, we can't change it. Fortunately, there's a easy solution: use a cancellation token source to manage the token.
Part 4 of my video series on Task and Await is now available. This time we look at the basics of cancelling an asynchronous process. To get code, articles, and other videos, check here: Exploring Task, Await, and Asynchronous Programming.
In continuing my video series on Task and Await, Part 3 is now available. To get code downloads, articles, and links to other videos, take a look at Exploring Task, Await, and Asynchronous Methods.
In this episode, we take a look at an alternate way of dealing with continuations with Task. There are lots of useful properties, including IsFaulted, IsCanceled, and IsCompleted. Unfortunately, IsCompleted doesn't mean what we think it means. Fortunately, we can look at Status for the information we're looking for.
This time we take a look at what happens if our asynchronous method throws an exception. This is pretty easy to deal with when using the "await" operator (we just add a "catch" block). And if we need to take full control over the situation, we can use the various continuation options that are available with Task.
Part 1 is currently available. This is all about how to consume an asynchronous method. We look at both using Task manually and using await to let the compiler do the heavy lifting. This will give us a good start as we head into looking at exception handling, cancellation, and finding the gotchas along the way.
I really love using the fluent syntax with LINQ. This gives me full access to all of the very useful extension methods.
In Part 2 of the Lambdas & LINQ video series, we took some time to understand the parameters of the Where method and also OrderBy. After seeing this, folks sometimes ask me: "What about Join?"
And why do they ask this question? Because this is the method signature:
Yikes.
But when we break things down, it's nothing that we haven't seen before. And that's exactly what we do in my latest video: Deciphering the Join Method.
I'm looking to produce other videos based on my articles (so that different folks can learn in the way that works best for them). If you have a favorite topics that you'd like to see put into video, let me know.
Captured variables are a really cool feature of lambda expressions. But it can also be dangerous if we try to capture the indexer of a "for" loop.
In my latest video, we take a look at the problem that we run into when we try to capture an indexer. And we'll also see how easy it is to get around the problem. There's just one thing we need to keep in mind:
The value of a captured variable is the value at the time it is used, not the value at the time it is captured.
And if you need a reminder of what captured variables are, be sure to check out Part 1 of the Lambdas & LINQ series: Lambda Expression Basics.
Let me know if you like the videos. If so, there will be lots more coming. But don't worry, the articles will keep coming as well. Some people like text, and some people like video. I'm glad to provide both where I can.