Showing posts with label NUnit. Show all posts

Wednesday, January 4, 2017

Trying to Get Foq Working with NUnit Test Runners (RESOLVED)

I've been exploring mocking using F# (Simple Mocking in F#... & More Simple Mocking...). At some point, mocking gets more complex, and it makes sense to use a mocking library. I've been looking at Foq but have had some issues getting things to work. It turns out the problem seems to lie with the NUnit test runners.

I'm looking for advice on how to get this working, so comments are very welcome here. (And I have tried searching on Google, but the keywords I've been using have not returned anything relevant.)

*** Update (Resolution) ***
When I tweeted out this article, I got lots of responses. That's one thing I really like about the F# community: they are always ready to help. It turns out the issue was easy to resolve. I just needed to change the F# Runtime version from 4.0 to 3.0 in the project settings:


After that, the tests ran successfully. Feel free to read the rest of this article if you're curious, but it turns out the solution was pretty simple (once you know about it).

If you'd like to grab the project, you can get it on GitHub: jeremybytes/mocking-tests.

The Problem
When I started exploring testing using FsUnit, I got error messages when I tried to use Foq. To narrow things down, I eliminated as many variables as possible. That meant using the sample from the "Foq.Usage.fsx" file that came down when grabbing the package from NuGet.

To setup the project, I created a new F# library. Then from NuGet, I got the following packages: "Foq" (v1.7.1), "NUnit" (v3.5.0), and "NUnit3TestAdapater" (v3.6.0).

The Sample Test
Here's the sample test copied from the usage file into the code file (in Library1.fs):


This test should pass, but it fails in the Test Explorer:


Here's the error message:
Method not found: 'Foq.ResultBuilder`2<!0,!!0> Foq.Mock`1.Setup(Microsoft.FSharp.Core.FSharpFunc`2<!0,Microsoft.FSharp.Quotations.FSharpExpr`1<!!0>>)'.
Unfortunately, I'm not familiar enough with code quotations in F# (and parsing expressions in general) to be able to understand this message. So I did some more work to try to narrow things down.

Verifying NUnit
First, I verified that NUnit and the NUnit3TestAdapater actually work with the F# library. For this, I simply added another test (in Library1.fs):


And the test runner has no problems with this. Here's the passing test and the failing test output:


Working Foq Test in F# Interactive
The reason I think the test runner might be the problem is that I was able to successfully run the test in F# interactive. To try to eliminate variables, I created a new script file with just the following (in Script.fsx):


When executing this script, I get the following output:


This shows me that we're not getting any errors just by running this script with Foq and the code quotation.

Testing for Failure
Just to make sure that things were working, I decided to invert the test. I changed the mock object so that it would return "false" instead of "true", but I left the assertion unchanged:


When executing this script, we get the NUnit test failure message:


So that is working as expected.

Trying the Console Runner
My next step to try to isolate this to the test runners was to try the NUnit Console Runner. For this, I grabbed the "NUnit.ConsoleRunner" (v3.5.0) package.

When running the library tests from the command line, I got the same result: 1 passed, 1 failed:


And digging through the output file, I came across the same message as when running the tests in Visual Studio.

Any Ideas?
So the question for the F# gurus out there: Is there a way to get the NUnit test runners to work with this Foq example?

Unfortunately, I'm not at the point where I can parse the error message, so I don't know if it's a simple fix, or something that won't work because of the way that the NUnit test runners are implemented.

*** Update (Resolution) ***
When I tweeted out this article, I got lots of responses. That's one thing I really like about the F# community: they are always ready to help. It turns out the issue was easy to resolve. I just needed to change the F# Runtime version from 4.0 to 3.0 in the project settings.

Why I Care
I know that some folks are saying, "Well just run your tests as a script." And that would work for some scenarios.

What I'm exploring is how to use F# for testing C# code. For that, I want the test runner experience to be as seamless as possible. I'm currently using NUnit, and I prefer to have the integrated test runner in Visual Studio. So that's why I'm looking into this further.

I'll be sure to post solutions because I'd really like to get this working, and I'm sure I'm not the only one.

Happy Coding!

Monday, April 25, 2016

Integrating NUnit into Visual Studio -- Update for NUnit 3

Overview: This article talks about using the NUnit Test Adapter to integrate the NUnit test runner with the Visual Studio Test Explorer. In particular, we need to ensure that we're using the right Test Adapter package for the version of NUnit that we're using.

I like using the Visual Studio Test Explorer. This is integrated into my environment, and I can always undock the window and move it to a different monitor. In particular, I love this button:


This is the "Run Tests After Build" button (it's currently only available in the expensive version of Visual Studio). When this button is toggled down, impacted unit tests are automatically run every time I build. This gives me immediate feedback when I break something.

Integrating NUnit with the Test Adapter
I've started using NUnit more and more (check out the "Why NUnit?" articles here: http://www.jeremybytes.com/Demos.aspx#UTMMF). In addition to the NUnit framework, there is also a Test Adapter package available from NuGet that integrates the NUnit test runner with the Visual Studio test explorer.

I've been using this functionality for quite some time now: Integrating NUnit into Visual Studio Test Explorer.

The problem is that we've had a bit of a version mis-match between NUnit and the Test Adapter since NUnit 3 came out last November. The good news is that last week (April 19th, 2016), the Test Adapter that's compatible with NUnit 3 finally hit release.

NUnit Version 3 and the NUnit3TestAdapter
To use NUnit and the Test Adapter with a particular project in Visual Studio, we just need to use NuGet to grab the appropriate packages. But we need to pay attention to the packages that we're pulling.

For NUnit 3, we want the following 2 packages:


Since we're using Nunit version 3 (specifically v3.2.1), we need to use the "NUnit3TestAdapter" package.

Note: This is a completely different package from the old test adapter. It is not merely the old package with a new version.

NUnit Version 2 and the NUnitTestAdapter
If you're still using NUnit version 2, we need to use a completely different test adapter package:


Here, we have NUnit version 2 (specifically v2.6.4), so we need to use the "NUnitTestAdapter" package.

Note: This is a different package from the new test adapter.

Wrap Up
The moral of the story is that we need to be careful about the packages that we pull down when using NUnit.

When using NUnit 3, we need to use the NUnit3TestAdapter package.
When using NUnit 2, we need to use the NUnitTestAdapter package.

Even though the NUnit framework packages are the same (with different versions), the test adapter packages are different packages. If we get a mismatch, then we won't see our tests in the test explorer.

But when we get the right packages together, things work great. We get to see our tests inside Visual Studio, and we can interact with them easily in the integrated environment.

Happy Coding!

Wednesday, March 9, 2016

More TDD Videos

I've recently published two more videos that explore Test-Driven Development a bit more. If you're new to TDD, then you might want to start with TDD Basics in C#.

The latest videos use the rules for Conway's Game of Life as the problem to be solved. I ran across Conway's Game of Life many years ago when I was first getting involved with computers, and the patterns have intrigued me ever since.
TDD: Don't Turn Off Your Brain
Test-Driven Development (TDD) lets our code develop out of our tests.  But this doesn't mean that we turn off our brain. We still need to make decisions on our design as we write our tests. In this video, we'll take some "bigger steps" with TDD to implement the rules for Conway's Game of Life. Along the way, we'll see the types of design decisions we need to keep in mind.
Watch the video on YouTube: TDD: Don't Turn Off Your Brain

Or watch it here:

To continue on with the code from Conway's Game of Life, we fix some bugs and test for exceptions.
TDD Debugging & Testing Exceptions
Test-Driven Development (TDD) lets our code develop out of our tests. But it is also extremely useful when we have to debug existing code. When we have a bug, we can first write a failing unit test, then write the code to get that test to pass. In addition to debugging, in this video, we'll see how we can test for exceptions in our tests. There are several approaches with different advantages.
Watch the video on YouTube: TDD Debugging & Testing Exceptions

Or watch it here:


For more articles on Conway's Game of Life and unit testing, take a look here: Coding Practice with Conway's Game of Life.

More videos on unit testing are on the way. Future topics will include using TDD with real-world applications, mocking, and testing asynchronous methods.

Happy Coding!


Wednesday, March 2, 2016

Testing with the BackgroundWorker Component

I recently received a question regarding how to test code that uses the BackgroundWorker component:
I am trying to write tests using NUnit on an application utilizing BackgroundWorker. I have gone through your course and read some of the articles on your blog. I am wondering if you can give me any suggestions on how to do so?
So let's explore this.

The code shown in this article is available on GitHub: jeremybytes/testing-backgroundworker-component. Specifically, look at the 01-IntegrationTests branch.

Application Overview
We'll start with our sample application that uses the BackgroundWorker component. Here's the functionality.

Application start:

Fresh Start
Initially, the "Start" button is enabled, and the "Cancel" button is disabled.

When we click the "Start" button, it kicks off our long running process (using the BackgroundWorker component).

Process Running

Here we can see the process running. The progress bar is updating, and we have a message "Iteration 21 of 50" that tells us how far along the process is. In addition, we can see the "Start" button is disabled, and the "Cancel" button is enabled.

If we let things run to completion, we get this output:

Process Complete
The "Output" has our final value (which should match the "Iterations" value), and our "Start" and "Cancel" buttons are reset to their initial states.

Our background process only does one thing in our sample: it pauses for 100 ms. This means that if we have an input value of "50", our entire process takes 5 seconds (5000 ms) to complete.

If we press "Cancel" partway through the process, we get this output:

Process Canceled
All of these UI elements are data bound to properties in a view model. This gives us a separate class that is easier to test.

Code Overview
We won't look at all of the code here; just the parts that we need to look at for testing. For a full overview of the BackgroundWorker component and how it helps us offload work to another thread, take a look at the walk-through and articles online: Keep Your UI Responsive with the BackgroundWorker Component.

For more information on using the BackgroundWorker component with the MVVM design pattern, take a look a this article: BackgroundWorker Component and MVVM.

If you'd prefer a video overview, you can watch my Pluralsight course: Introduction to the .NET BackgroundWorker Component.

View Model Properties
We'll concentrate on testing through the view model today. This is the "MainWindowViewModel.cs" file that is part of the "DataProcessor" project (from the GitHub code).

Here are the properties from the view model:


These directly relate to the UI elements.
  • Iterations is databound to the "Iterations" box on the UI
  • ProgressPercentage is hooked up the progress bar
  • Output is databound to the "Output" box
  • StartEnabled determines whether the "Start" button is enabled
  • CancelEnabled determines whether the "Cancel" button is enabled
Because we have data binding in place (along with INotifyPropertyChanged), whenever we update one of these values, the UI elements are automatically updated.

In addition to these properties, there are 2 public methods:


These methods are called when the corresponding buttons are clicked in the UI. The "StartProcess" method kicks off the background process using the BackgroundWorker component, and the "CancelProcess" method lets the BackgroundWorker know that cancellation is requested.

Determining What to Test
When I think about adding tests to existing code, I think about *what* I want to test. Then I can move forward to determine *how* to test it.

In testing the view model, I want to check the behavior of the various methods and how the properties are updated. I test the public members of my classes since this is how my class exposes itself to the outside world.

So I really want to make sure that the properties are getting updated which means that we get the expected behavior from the application. (For the expected behavior, we can refer to the screenshots at the beginning of the article.)

Determining How to Test
Now we have to look at the best way to test this code. Ideally, I want granular unit tests that will verify the behavior of my view model and also the behavior of my background library. Unfortunately, we have some tight coupling between our view model and library, so granular unit tests will require some code modification.

Rather than modifying the code, we'll start out at a higher level of testing. These would be considered "integration tests" because we're really seeing how both our view model and library behave together. The reason that we're starting here is that we can write these tests *without* modifying the existing application.

This will give us a good starting point. Then from there, we can look at what code needs to change to make the unit tests easy to write.

Integration Tests
In addition to the "DataProcessor" project that we saw above, we have a separate project called "DataProcessor.Tests". This is a class library where we've added the NuGet packages for NUnit and the NUnit Test Adapter.

For more information on setting up NUnit and the Test Adapter, you can watch a minute or two of my TDD Basics video: TDD Basics @ 2:55.

Testing Output
Our tests are in the "MainViewModelTests.cs" file. Here's our first test:


The purpose of this test is to verify that the "Output" value is the same as the "Iterations" value if we let the background process run to completion.

In the "Arrange" section, we create an instance of our view model, and then we set the "Iterations" property to 5. As a reminder, we're using the same background library that our application uses. This means that our background process will run for 500 ms (approximately).

In the "Act" section, we kick off our background process, and then we wait. The "await Task.Delay(600)" method will pause operation for 600ms. (And note that since we're using "await", we also need to mark our test method as "async". This works just fine in NUnit and most other testing frameworks.)

This pause is very important. Since our background process is running on a separate thread, our test code will continue to run. Rather that moving immediately to the "Assert", we give the background process time to complete. Having tests with delays in them is definitely not ideal, but this gets us started on the road to testing.

In the "Assert" section, we verify our expectations: that the value of our "Output" (a string) matches the value of "Iterations" (converted to string).

Another Output Test
If the process gets canceled partway through, then we expect that the "Output" property will contain the string "Canceled". Here's a test for that:


For the "Act" section here, we start the process, wait 100 ms, then cancel the process. The reason for the first pause is that we want to give the background process a bit of a chance to run before we cancel it. The second pause (after the cancel) is to give the background process a chance to handle the cancellation request.

Then our assertion just verifies that our "Output" value is "Canceled".

Testing StartEnabled
To make sure that the "StartEnabled" property is getting set appropriately, we'll look at 3 different cases: (1) before the process is started, (2) while the process is running, and (3) after the process is completed.

The first case is pretty simple:


We just initialize our view model and check the value of the property (which should be "true").

Here's are test for the "running" state:


Here we start the process and then wait for 100 ms (reminder, our test case should take 500 ms to complete). Then we verify that the property is "false".

Lastly, we wait for completion:


Just as with our first "Output" test, we wait 600 ms to give our process time to complete. The first assertion (in the "Act" section) is a sanity check to verify the process is complete.

The second assertion (in the "Assert" section) is our verification that the "StartEnabled" goes back to the correct value ("true").

Testing CancelEnabled
The tests for the "CancelEnabled" property look just like the tests for the "StartEnabled" property -- except the expected state is reversed ("true" vs. "false"). We won't bother to look at the tests here, but you can see them in the code project.

Testing Progress
Our tests have been a bit less-than-ideal so far -- I don't like to have delays in my tests, particularly 1/2 second delays (those really add up). But our goal at this point is to get some useful tests out of our existing code.

The last property that I want to test is the "ProgressPercentage" (which is tied to the progress bar in the UI). Unfortunately, our current code doesn't give us enough information to let us know if the progress percentage value is accurate. Calculating that percentage is really a job for the background process, and in a future article, we'll look at modifying the code to make that testable.

What we *can* test with the current code is to make sure that the "ProgressPercentage" property gets updated the correct number of times.

For our test example, we have an "Iterations" value of 5. On each iteration, our progress is updated. Based on that, we would expect that the "ProgressPercentage" gets updated 5 times if we run to completion.

However, the last step of our process is to reset the progress bar back down to "0". So there's actually 1 more update that is part of our process. This means our "ProgressPercentage" should change 6 times in our test scenario.

Tracking Changes
So how do we track how many times a property has been changed? For this, I pulled out the "PropertyChangeTracker" project that I've been working on. This is a helper class that hooks up to the "INotifyPropertyChanged" event. Each time a property is changed, our tracker will know about it.

The existing tracker code knows how to track *when* a property changed. I added a new method to let us know *how many times* a property has been changed:

From the PropertyChangeTracker

This simply counts the number of times that a property name appears in the internal notifications list.

The Test
Here's our test for the "ProgressPercentage" property. This initial test will make sure that the property gets updated 6 times if we let things run to completion:


We have a couple new times in our "Arrange" section. Since set an "expectedProgressCount" variable based on the "Iterations" property. This is the value we will use in our assertion.

Then we create an instance of the PropertyChangeTracker (for details on usage and purpose, see the original article).

In the "Act" section, we reset the tracker. This will clear out any notifications that may have already been received. Then we start the process and let it run to completion.

The last step is to get the "ChangeCount" out of the tracker. We use the "nameof()" expression here to make sure we don't have any typos in our parameter.

In the "Assert" section, we compare our expected value with the value that we pull out of the change tracker.

Progress and Cancellation
There is one more test for "ProgressPercentage", and that's when we cancel the process. Again, since we can't easily get details on progress without cracking open our code, we'll just do a basic sanity check.

If our process is canceled, then we expect that the "ProgressPercentage" property is updated *fewer* than 6 times. Yeah, it's not a lot of information, but we'll go ahead and put a test in for this:


We've seen the various parts in previous tests, so we won't go through them again.

Test Results and Concerns
These tests all come up green with our existing code:


These tests are better than not having any tests at all, and we are able to validate functionality of both our view model and our background library.

But we do have a few problems.

Look at the times. Many of our tests take over 500 ms to run -- this is half a second! Our very small test suite takes 7 seconds to run. The longer our tests take to run, the less frequently we run them.

Look at what we're testing. We're testing *both* the view model and library functions here. That means if one of our tests fail, we'll need to do some digging to figure out what part of the code is actually failing.

Look at the pauses. I really don't like the idea of having "Task.Delay()" in any of my tests. I would rather have tests that rely on something more deterministic (which is one reason why I use the PropertyChangeTracker object in other code). With our tests, they may sometimes fail if something takes a bit longer to run. Inconsistency is not good.

These problems could be fixed by modifying our code and focusing on unit tests

Unit Tests
With unit tests, we're looking at a single piece of functionality and verifying a single assumption. Let's look at a few things we could change to make this code easier to unit test.

First, add an interface for our background library. By adding an interface, we create a "seam" in our code. We can combine this with property injection to make it very easy to replace the real background library with a fake background library that we can use for testing. This would give us better isolation so that we could test our view model independently.

Next, move progress reporting to the background library. In the current code, our calculation of the progress percentage is happening in our BackgroundWorker method (in the view model). This calculation should be moved to the library the BackgroundWorker is calling.

If we combine this with additional progress properties in our library/interface, we can verify that progress is being calculated correctly.

Then, modify the code to make it easier to test cancellation. One of our problems is "start / pause / cancel / pause" in our tests. By adding an interface, we can easily create a fake library that takes no time at all to finish; this would eliminate our pauses waiting for completion. But with a little bit more modification, we can write tests that would verify cancellation without having the awkward pauses.

I'm not exactly sure what this code will look like. It will take a bit of experimentation to make sure that we're eliminating the problems mentioned above.

Look forward to these changes in a future article and a new branch in the GitHub project.

Wrap Up
When we're trying to add tests to existing code, it's often best to take small steps. By looking at what we *can* test without code modification, we can get some of the benefits of automated testing. And some valid tests are better than no valid tests. (Note: having a bunch of invalid tests is *worse* than having no tests at all.)

From there, we can start to look at the shortcomings of the tests we're able to easily make. Then we can think about the tests we really want to write and ask ourselves "Why is it hard to write this test?" From there, we can look at loosening the tight-coupling, breaking out features, and adding bits of information that will make it much easier to write our tests.

My goal is always to have code that is easy to read and maintain and also have tests that are easy to read and maintain. This isn't always something we get to overnight -- especially when we have existing code. But we can take small steps, and we'll eventually get to where we want to be.

Happy Coding!

Tuesday, November 24, 2015

Unit Testing Comparison Videos

In my presentation "Unit Testing Makes Me Faster", I show a couple of videos that compare manual testing and unit testing. Folks have asked me to make these videos available, but they don't really make sense without context. So, we're going to look at both here.

The Method
Here's the method that we have in our code that needs to be tested:


The particulars aren't important. This method checks to see if a credit card number passes the Luhn algorithm -- basically a checksum on a credit card number. We need to make sure that this method works.

If you want to look at the code for this, you can get it here: Unit Testing Makes Me Faster.

Manual Testing
Before I started unit testing, I would commonly throw together a tester application just to sanity check the algorithm. This would be a simple application with some input/output fields and a button.

In this case, I built a little WPF application (since WPF is my UI of choice these days). This application just takes a few minutes to build, and we end up with something that looks like this:


The code-behind for the button calls our method and puts the results in an output block:


To use this application, we paste our test numbers into the text box, click the button, and then check the output. This will tell us whether the "PassesLuhnCheck" method returns true or false:


Unit Testing
Building unit tests for this method is pretty simple. We just create a method to check for "true" results and a method to check for "false" results. To make things easier, we can parameterize the methods so that we can check multiple numbers.

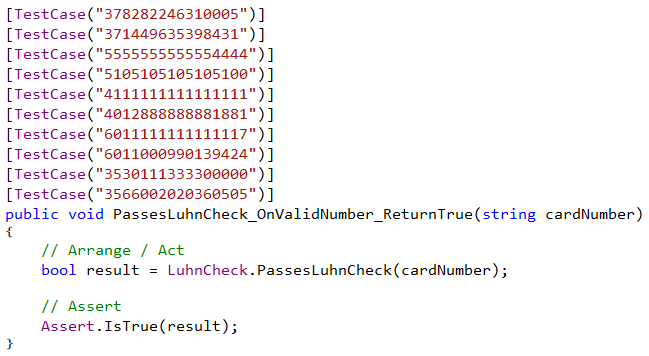
Here's our check for the numbers that should pass the Luhn check (and thus return "true"):


Because we're using parameterized tests, we can check 10 different cases with this one method.

For more information on parameterized tests, see Parameterized Tests with NUnit.

We can do the same for the numbers that should not pass the Luhn check:


This gives us 5 more test cases that should all return "false".

Build Comparison
And this takes us to the comparison videos. In the first video, we show side-by-side building the tester application and implementing the unit tests. This starts from scratch (File -> New Project) for both options.

So that we don't have to wait too long, this video is sped up 3 times faster than normal:


Direct video link: Side-By-Side Test Build

What this shows is that when we're comfortable with our tools, it takes about the same amount of time to build either test solution -- about 5 minutes in this case.

There is a big caveat there: when we're comfortable with our tools.

In my case, I am comfortable with WPF XAML and with unit testing using NUnit. If I did not know WPF, then I would expect that building the tester application would take me a bit longer. In the same way, if I were new to unit testing and NUnit, I would expect that building the unit tests would take me a bit longer.

But if I'm comfortable in both environments, then we get a fair comparison between these solutions.

The build times may be similar, but we see a real difference when we look at regression testing.

Regression Comparison
Regression testing is when we make sure that we didn't break any existing functionality in the code. It's a bit hard to tell in the above video, but we do have some failing tests. If the input contains a non-numeric (such as a letter or a minus sign), then the method we're testing throws an exception.

Our job is to fix the method so that our tests will pass (without throwing exceptions), and then we need to go back and check that we didn't break the existing functionality.

This video shows a side-by-side comparison of fixing the problem and then running regression tests. This video is *not* sped up; it is real time:


Direct video link: Side-By-Side Regression Test

This is where we see a huge difference. With our unit tests in place, after we make the change to our code, we simply build and re-run the tests. The tests take 3 seconds to run. We get confirmation that our changes fixed the problem and also that we didn't break the existing functionality.

For the manual test application, we need to go through our test cases and copy/paste them into the application and click the button. This only takes about a minute to do. But even so, it's painful to watch. If you watch closely, you'll see that the unit tests are complete before we have a chance to check the first value manually.

The real question is which type of regression are we most likely to do? If the tests run automatically in 3 seconds, then I'm going to be running those tests all day long. If I have to go through a manual process of copy/paste and clicking, then I'm never going to do that.

Wrap Up
Doing side-by-side comparisons of various testing methods can give us a good idea of where the advantages lie. Granted, it takes time to get up-to-speed on unit testing, but that's no different from any other framework. And there are many other advantages to having automated tests in place as well. Check out the materials for some more information: Unit Testing Makes Me Faster.

Happy Coding!

Saturday, November 21, 2015

Fixing an NUnit Version Mismatch

Sometimes demos don't always go according to plan.

For those of you who were at Live! 360 this past week, I had a little trouble when I was showing how "easy" it is to get NUnit working in Visual Studio. Normally it is easy -- in fact, it's just as easy as this: Integrating NUnit into the Visual Studio Test Explorer.

But these steps did not work for me this past Wednesday. I added both NuGet packages, but the tests did not show up in the test explorer. Fortunately, I had a working solution that I prepared earlier, so we were able to continue with the demo.

The answer to the problem turned out to be pretty simple, but it wasn't something I could troubleshoot on the fly.

[Update 3/4/2016: A demonstration of installing NUnit in Visual Studio 2015 (including dealing with the current version mismatch) is available by watching a few minutes of this TDD video: TDD Bascis @ 3:30.]

[Update 04/20/2016: The 3.0 version of the Test Adapter has just been released. When using NUnit 3.0, be sure to use the "NUnit3TestAdapater" package from NuGet. When using NUnit 2.0, use the "NUnitTestAdapter" package from NuGet. More information here: Integrating NUnit into Visual Studio - Update for NUnit 3]

Version Mismatch
I suspected I might run into a problem when I saw the icons in NuGet:


I needed to add the first and third packages from this list. I noticed that the top one (the NUnit testing framework) had a new icon. And it didn't match the NUnitTestAdapter (the part that plugs into the Visual Studio Test Runner).

During the demo, I just hoped for the best. Unfortunately, this didn't work out so well.

Further Investigation
After the demo, I did some further investigation and found that the version numbers were, in fact, different.

NUnit framework version 3.0.0

NUnit test adapter version 2.0.0

NUnit 3.0 was *just* released. Unfortunately, the test adapter for version 3.0 had not yet been released (CTP 7 was available when I looked into this).

The Working Version
So one question is why did my pre-built version of the project work? Well, the NuGet packages that were saved off with the project were both for the 2.0 release of NUnit. Here's a screenshot from the video that shows the side-by-side build:

Previous NuGet packages showing 2.0 icons
This has the icons that I was expecting to see on Wednesday. Since I didn't refresh my NuGet packages, I kept using the versions previously downloaded, and everything worked as expected.

As a reminder, you can see the videos and get other materials from the presentation on my website: Unit Testing Makes Me Faster.

Starting from Scratch
So the next question is how would we follow along with this sample if we wanted to start from scratch? The answer is that we just need to get the previous version of NUnit from NuGet.

In addition to the "Install" option in NuGet, we also have the option to "Downgrade":

Downgrade to Prior NUnit version

When we do this, we can select the latest 2.0 version (2.6.4) or another version from the drop-down. If we install the 2.6.4 version of NUnit with the 2.0.0 version of the Test Adapter, then everything works as expected.

[Note: The latest NuGet package manager does not have a specific "Downgrade" option. Instead, you just pick the version you want from the "Version" drop-down, then click the "Install" or "Update" button.]

(An alternate solution is to get the pre-release version of the Test Adapter, but I don't normally use pre-release software. I like for other folks to shake out the bugs a bit first.)

This is a short-term problem. Hopefully in the very near future, the 3.0.0 version of the Test Adapter will be released, and we can go back to doing things the easy way.

Wrap Up
Things don't always go as we expect. And that's okay. But we should take the time to review what happened, try to figure out the core issue, and put steps in place to make sure it doesn't happen again.

In my case, I have another demo project that has the skeleton of the testing library. In that project, the NuGet packages for NUnit have already been included in the project. That means they don't need to download live, and we know that the version we have will work for the presentation. I actually already had this project so that I could still run this demo without a live internet connection, but I decided to take the chance at Live! 360 since I had good network access.

I had a great time presenting at Live! 360, and I'll look forward to coming back and doing it again.

Happy Coding!

Tuesday, October 6, 2015

Getting NUnit Test Parameters From a File (or Other Source)

NUnit has *a lot* of options. One of the options that I like is the ability to easily parameterize a test by using attributes. For an example of this, see Parameterized Tests with NUnit. During one of my recent presentations on testing, someone asked:
Is there was a way to get test parameters from a file or a database?
The answer is Yes!

Let's take a look at some of the different options that we have for providing test parameters for NUnit to use.

The Unit Under Test
Before looking at the tests, let's take a look at the method that we're testing. This code is taken from "Unit Testing Makes Me Faster", and you can download the code here: Session - Unit Testing Makes Me Faster.

Here's the method -- PassesLuhnCheck:


This method runs the Luhn algorithm against a potential credit card number. This doesn't tell us whether a credit card number is valid, but it tells us whether the card has the potential to be valid.

For example, let's think about validating a phone number. If it has 10 digits, then it has the potential to be a US phone number. But if it has "555" in the middle (like "714-555-1212"), then we know that it is not a valid number, since "555" is a fake exchange that is used in movies and television.

The Luhn algorithm does something similar with credit cards (only with arithmetic on the digits themselves). This is mainly to catch if someone transposes 2 digits when entering a card number.

You'll notice that I don't show the body of the method here. That's because it isn't important for what we're doing. We're doing some black box testing: valid numbers should return "true", invalid numbers should return "false".

So, let's look at some tests.

Parameters in Attributes
The first way to get parameters into our tests is by using attributes on the test methods themselves. This is what we saw in the previous article about parameterized tests. Here's our test for numbers that should pass the Luhn check.


This has a number of "TestCase" attributes. The parameter in the attribute is passed as a parameter to the test method -- the "testNumber". Then the test just runs the "PassesLuhnCheck" method and verifies that it returns true.

BTW, don't bother trying to buy things with these numbers on Amazon; these are test numbers provided by the credit card industry. They pass the Luhn check, but they are not valid accounts.

There is a similar test for invalid numbers:


And here are the results of our tests:


Notice that we get a test result for each of our test cases. By looking at the parameters, we can tell which number was used with each test. This is one of the cool things about how NUnit handles parameterized testing.

But we have some other options as well.

Test Parameters in Code
Instead of putting the test parameters in attributes, we can also create the parameters in code. To do this, we just need to create an object array with the parameters that we want to use. In our case, we only have 1 test parameter, so we can use a string array. Here's what that code looks like:


Here we have our same test numbers, but we've put them into a static string array. Then our test is attributed with "TestCaseSource" and we tell it what object to use for the parameters.

We can do something similar for our invalid numbers:


When we run the tests, we get the same results.


So far so good. But what other options do we have?

Test Parameters From a File
It would be really great if we could get our parameters out of a file (or database). For that, we'll need to parse a file. Here's what our test file looks like:


This is the "NumbersToTest.txt" file. The format isn't ideal, but it's not very difficult to parse in code, either. Instead of using a static string array, we'll use a static method that returns a string array. Here's our code:


Let's walk through the "MorePassingNumbers" method. Here we have a path to our test file. I just hard-coded this to make things easier. Then we read all the lines in the file. We skip the first line since that has the "VALID NUMBERS" label. Then we keep reading until we get to an empty line.

The end result is that we have a string array of our valid numbers. Then we just have to update our "TestCaseSource" attribute parameter to use "MorePassingNumbers".

We can do something similar with the invalid numbers:


This code is similar. The difference is that we skip everything in the file that comes before the "INVALID NUMBERS" label. Then we skip one more line (the label). Then we read to the end of the file.

After updating the "TestCaseSource" attribute, we see that we get similar results to what we had above. But this time, we're reading from a file:


Now that we're running code to get our parameters, we can get our parameters from wherever we want. Instead of opening a text file, we could make a database call -- although we need to be aware that we want to keep our dependencies light so that our tests have a good chance of running successfully.

We have some other options as well.

Using TestCaseData
We'll look at one more option. This gets interesting if we have our test parameters and expected results stored together. Instead of having 2 separate tests, we can have one. Then in our parameters, we also supply the expected result of the test.

For this, we'll use a class from NUnit called "TestCaseData". We need to create a public static class that has a public static property. This property should return an IEnumerable that consists of TestCaseData objects.

Here's an example of that:


If you're not familiar with the "yield return" statement, this just lets us create our own IEnumerable really easily. In this case, we're just using hard-coded data.

Each time we ask for the next item of our IEnumerable, it will return whatever is at the next "yield" statement.

Now let's look at the TestCaseData object. First we construct the object (using "new TestCaseData"), and the parameter is the parameter that we want to use for our test. If we had multiple test parameters, then we would pass them into the constructor here.

Then we use a fluent syntax to denote that we expect a particular return value based on this TestCaseData. So we can see that each of our test cases will expect a true or false value depending on the number.

The test that uses this data looks a bit different from the other tests we've looked at:


First notice the attribute. We use the TestCaseSource attribute. Then for the parameter we use "typeof" with the name of our class -- in this case "CreditCardTestCases". The next parameter is the name of the property that we want from that class -- "TestCases".

The test itself has a parameter (testNumber) like before, but the rest of the method is quite a bit different. We return a "bool" value here (instead of "void" like our other tests). And then the body of the method just runs our method under test and returns the result.

NUnit will look at the TestCaseData and pass in the parameter. Then it looks at the result value and makes sure that it matches the "Returns" part of the TestCaseData.

We only have 1 test now that handles both the valid and invalid numbers. And we get the expected results in our test explorer:


I'm not a big fan of having a single test because when I look at the test results, I can't tell whether I'm testing a valid number or an invalid number. When a test fails, I want to look at the test name (and parameter) to figure out what failed. In this case, we'd have to drill into the test results to see the expected result (true or false).

Getting Data From a File
As you can imagine, we can use this same technique to get data from a file or database. Let's see how we can get our test parameters and results from our text file:


This is a bit more complex that I'd like due to the nature of our text file. We get 2 different collections from the file -- one for the valid numbers and one for the invalid numbers. This uses that same parsing that we saw above (and it's not very efficient since we read the file 2 times). We could probably spend a bit of time to optimize this.

Then we have 2 "foreach" loops. Each of these has a "yield return" which will return the appropriate "TestCaseData" object. And the reason we have 2 loops is that we do not have the expected result in our file, so we need to hard-code that here.

Another option is to change the format of the text file so that it includes both the number and the expected result. This would be pretty easy to do, but for this simple example, I just wanted to keep the current file format. You can use your imagination for parsing a different file format (or even querying a database).

To use this in the test, we just need to update the property name in our attribute:


This now points to the "TestCasesFromFile" property that we just looked at. And as you can imagine, we still get the expected results from our test:


Again, I don't really like the idea of having the combined test, but I've talked to several people who do like to format their tests this way. If it works in your environment, and the members of your team understand it, then there's no reason to change it.

Wrap Up
NUnit is a very flexible testing framework. We've seen several ways to get parameters into our test, and we haven't even seen all of the options for that. For more information, be sure to check out the NUnit documentation: NUnit - TestCaseSource Attribute.

I'm always looking at what features are available in the tools that I use. I may not use all of them (in fact, I probably won't use all of them), but it's great to know that there's an easy way to solve a particular problem if it pops up in my code.

We should keep learning about the tools we use and the tools that are available to us. This will save us lots of heartache and will keep us from building things ourselves. It's always great to find that particular feature that is just what we need for a problem.

Happy Coding!