Wednesday, December 23, 2015

Visual Studio Shortcuts: Format Document

It's time for another one of my favorite Visual Studio shortcuts: Format Document. I use the keyboard shortcut Ctrl+K, D (but there are other options as well).

Compilers Don't Care but Humans Do
Well formatted code makes it easier for humans to read and navigate. Many languages (including C#, the primary language I'm using these days) don't care about white space.

That means that this method is perfectly valid C#:


Ack! This code compiles and runs just fine. But it's very difficult to read.

Note: This code is taken from "I'll Get Back to You: Task, Await, and Asynchronous Methods". The source is on Github: https://github.com/jeremybytes/using-task.

Format Document to the Rescue!
Fortunately, Visual Studio can fix this. All we need to do is find the "Format Document" option on the Edit menu:


This is under Edit -> Advanced -> Format Document.

You can see the keyboard shortcut listed here is Ctrl+E, D, but Ctrl+K, D also works. There's a pretty extensive list of shortcuts listed here: http://visualstudioshortcuts.com/2015/

Once we "Format Document", things are much easier to read:


Much better!

Controlling Formatting
I generally stick with the default formatting for C#. But if we don't like the defaults, they're pretty easy to change. For this, we look at Tools -> Options.


These are in the tree under Text Editor -> C# -> Formatting. (And of course, we can have different settings for other languages and file types.)

One thing that I like about this dialog is that it gives previews to help us make the selections. For example, let's look at the "Indentation" option. If we select "Indent open and close braces", we see a preview in the bottom half of the pane:


If we check the box, the preview updates:


This lets us see what the code will look like if we select any particular option. And the code samples are different for each option. This makes sure we have a relevant block of code for whatever option we chose.

It can get a little confusing because we can check boxes without selecting the option in the list. In this case, the preview pane doesn't always update. So I would suggest clicking on the item itself before checking/unchecking the box.

Lots of Options
There are a ton of different options. For example, what if we want to take full control over where the opening curly braces go. Here are just a few of the options under "New Lines":


In this case, we always want to have opening braces on their own line (which is my preference), but we can choose individual items if we want something different -- this would let us implement the K&R style (although I don't recommend that).

And when we dig into options a bit more, we see that we have the choice to leave block elements on a single line (meaning, the opening and closing brace are on the same line). Or we can always expand those to multiple lines.

The customization is a little overwhelming, but it's nice to have the flexibility to auto-format the code the way we want.

Sharing Format Options
If we're working alone, it doesn't really matter what formatting options we choose. But once we start to get into a shared environment, Things are a bit different.

For example, if I prefer to have my code formatted differently than my co-worker, we'll end up with a mess in our source control. That's because if we make formatting changes, our diff tools can't always pick out the changes that impact the code and the ones that are simply formatting. So generally, it's best to have a format that everyone agrees on (or run things through a shared formatter before checking in).

To share options with the team (or even just between different computers), we can export our settings. From the Tools menu, just select "Import and Export Settings...":


Then follow the steps in the wizard to save off a file or load a file. When exporting, we can even choose which items we want to include:


This lets us create a file that only has Formatting options. Then when we import it, we only get those particular settings.

Format Document is not Perfect
"Format Document" is really awesome, but it's not quite perfect. It would be nice if Visual Studio could read my mind (actually, that might be kind of frightening -- never mind).

Sometimes we have to do some manual formatting. But it's still pretty easy to do. For this example, we'll look at a lambda expression:


Again, the compiler doesn't care about the formatting of this code, but the humans do.

Note: This is the code that is seen in "Anatomy of a Lambda Expression".

If we use "Format Document" here, I don't quite get the results that I want:


You might say, "That looks okay." But it gets a little more obvious once I move the parameters "(s, e) =>" to the next line.


These are indented a level. And this is actually what I want since this is a continuation of the original assignment statement. But using "Format Document" here doesn't change anything. The indentation for the lambda expression stays the same. But there's a pretty easy workaround.

We'll start by highlighting the lines we want to indent:


And then press "Tab". This will indent the entire block (And we can use "Shift+Tab" to un-indent):


This is what I want.

We'll get similar results when we use class initializers and some other constructs. So it's good to keep this in the back of our minds.

Wrap Up
Visual Studio is a full-featured development environment. There are many shortcuts and helpers that let me focus on the code and quickly perform otherwise tedious tasks.

Formatting code is critical for human readability. For the most part, Visual Studio will format the code as you type it in or paste it in (also customizable under the Formatting options). Sometimes, we want to quickly get a code file into shape. For that, "Format Document" works great.

Happy Coding!

Wednesday, December 16, 2015

Visual Studio Shortcuts: Surround With

I really love snippets in Visual Studio. They save me a lot of typing. But there's a feature that we can use with code snippets that isn't very obvious but is extremely useful: Surround With.

And for those of you who think this is something new, it isn't. It's been around for a long time.

Try/Catch Snippet
The try/catch code snippet is one of my favorites. To use the standard snippet, we just type in "try":


If we look at the note, we see that we just have to press Tab twice to use this. And when we do, it stubs out the code for us:


Also note that the "Exception" is currently highlighted. This means that we can type in a new exception type without moving the cursor.

This is great when we are writing some new code. But usually, we already have a block of code that we want to wrap in a "try" block. So, we probably use the "try" snippet and then cut/paste the existing code to move it into the "try" block.

But there's an easier way: Surround With.

Surround With Try/Catch
Let's look at a shortcut. For this we have a method with some existing code:


We want to wrap the middle part of this method in a try/catch block.

Note: This code is taken from "I'll Get Back to You: Task, Await, and Asynchronous Methods". The source is on Github: https://github.com/jeremybytes/using-task.

Instead of using the "try" snippet by itself, first, we'll highlight the block of code and then use the keyboard shortcut "Ctrl+K, Ctrl+S". This gives us a popup:


The popup has a pretty long list of code snippets that we can use. In this case, we'll type in "try" (just like we did earlier):


Then when we press "Tab" or "Enter", we see our code is surrounded with a "try" block:


Notice that the "Exception" is highlighted (just like with our original snippet). We can type in a new exception type:


And then when we press "Enter", the cursor moves to the inside of the "catch" block:


And then we just need to type in our own code:


This makes it really easy to add a try/catch block to our code. Let's try this again, but with a try/finally instead.

Surround With Try/Finally
Let's go back to our original method:


We'll take a slightly different approach. Instead of handling the exception here, we'll assume that we have an exception handler upstream that will take care of things. But we still have some code in this method that we have to worry about.

Notice that at the top of the method, we disable a button. Then at the bottom of the method, we re-enable it. We want to wrap this in a try/finally so that the button gets re-enabled even if there's a problem along the way.

So we'll highlight the same block that we had before, and use "tryf" for the try/finally snippet:


The output gives us an empty "finally" block:


Then we can move the code that re-enables the button into the "finally" block:


This way, we know that our button will get re-enabled, even if there is an exception along the way.

Other Snippets
When we use "Surround With", the snippets that come up all have a body of some sort.

For example, we can use the "if" snippet to wrap code in an "if" conditional. We can use the "while" snippet to wrap code in a "while" loop. The same is true for "for" and "foreach", and also for "using" and even creating regions ("#region").

Wrap Up
One of the reasons that "Surround With" isn't well known is because it's hidden pretty well. It's available on the right-click menu:


And it's also available with the keyboard shortcut (which I use all the time).

"Surround With" is one of those great little tools that makes Visual Studio such a great programming environment.

Happy Coding!

Sunday, December 13, 2015

Lazy vs. Careless

I am a lazy developer. I have no trouble admitting that because laziness is what drives me to automate tedious processes. It's what compels me to let my tools do as much work as possible. It's what pushes me to use unit testing for easy regressions.

I try to avoid being careless. Carelessness is what tempts us to cut corners when we know we should be doing something differently. And carelessness often comes back to haunt us.

I made a careless decision 6 years ago that is still causing me problems. Let's see where things went wrong, and hopefully others can learn from my mistake.

But before we do that, let's take a closer look at the differences between lazy programming and careless programming.

Lazy Programming
Laziness can be a virtue as a developer. Over the years, I've learned lots of shortcuts in Visual Studio (my primary development environment). This includes keyboard shortcuts as well as code snippets and code completion.

Visual Studio Helpers
In Visual Studio 2013 (and earlier), it wasn't always obvious where Visual Studio could offer us help. I always tell people to look for the little purple rectangle:


Here we have a class that declares that it implements an interface (IPersonRepository), but it doesn't yet have any of the required methods. The little purple rectangle under the "I" tells us that Visual Studio wants to help us out. (This does have a name, but I always forget what it's called -- and it's very difficult to search online for that.)

Whenever we see this, we can press "Ctrl" + "." to get a popup:


Then if we choose "Implement interface 'IPersonRepository'", it does all the hard work for us:


Now all 6 methods are stubbed out for us. This saves us the hassle of having to copy/paste method signatures whenever we implement an interface.

In Visual Studio 2015, the purple underline has been replaced with a more prominent light bulb:


When we click on the light bulb (or press "Ctrl" + "."), we get a similar popup that allows us to implement the interface. Plus, we get a bit of a preview to show what Visual Studio plans to do for us.


This is just one example of how Visual Studio fills in code for us that would otherwise be tedious to type in.

Keyboard Shortcuts
Another thing I love are keyboard shortcuts. Unfortunately (or fortunately), there are tons of them. I've picked a few that have been most useful in my coding:
  • Ctrl+K, Ctrl+C : Comment current line/selected block
  • Ctrl+K, Ctrl+U : Uncomment current line/selected block
  • Ctrl+K, Ctrl+D : Reformat document
  • Ctrl+K, Ctrl+S : "Surround with" - wraps a selected block in a code snippet
  • Ctrl+Shift+B : Build project
  • Ctrl+Space : Show code completion options
  • Ctrl+Shift+Space : When inside method parens, this pops up the list of parameters
These are the default key mappings when using Visual Studio with the C# settings. Resharper has its own set of keyboard shortcuts.

The point is that we can get a productivity boost when we learn how our tools can make development faster.

Snippets and Completion
I love code snippets. I use them to quickly create properties and "for" loops. I also love the "Surround with" keyboard shortcut in conjunction with the "try" snippet to wrap a block of code in a try/catch block (or the "tryf" snipped to wrap a block of code in a try/finally block).

And when hooking up event handlers, let's let Visual Studio create the methods for us. After typing an event and then "+=", we get some help:


When we press tab, we get a chance to rename the method:


And when we hit tab again, the event handler is stubbed out for us:


This example is from Visual Studio 2013. Visual Studio 2015 handles things a little bit differently; it stubs out the method first and then uses the new rename functionality to give us a chance to pick a new name.

Lazy is Good
So when we look at laziness in this sense, it's good. It gives us motivation to learn our tools so that we can write code quickly and easily. In addition, it's changed the way that I test code. I'm heavily into unit testing, and that's primarily because it's faster and easier for me -- especially when it comes to regression testing.

Probably the best thing about laziness is that it drives us to automate tedious tasks. Let's write a script rather than checking values manually. Let's put together a small application so we don't have to verify values every day. Let's automate deployment -- 1 click to build, test, deploy.

Careless Programming
What we really need to watch out for is carelessness in our programming. This is where we cut corners when we're putting things together. It could be global variable that we put in because it's faster to write than trying to figure out a more appropriate way to handle the functionality.

A global variable doesn't sound like it could cause a ton of problems, but it can. I worked on an application where I used a global variable to hold some shared data. The problems came about when reliance on the global variable meant that a single class kept getting bigger and bigger (because it needed that variable) rather than things getting split up into more appropriate chunks. That made things harder to support as time went on.

But that's not the carelessness that is still causing me problems. For that, we'll need to look at my sample applications.

A Simple Data Set
Way back at the end of 2009, I was working on some sample applications for my first outing as a speaker. Those first presentations were in January 2010, and I put together some simple data to use with them. Here's the output from a Silverlight example on how to use data templates and value converters:

from Intro to Data Templates and Value Converters in Silverlight

This shows a set of 7 records. (And in case you're curious, they are "television outer space commanders".) For this Silverlight application, I needed a web service, and ended up with a method that hard-coded the data:


This looks harmless enough, but I made a careless decision to cut a corner. And that was getting the dates into the data:


I decided to use a DateTime.Parse because I was copying the dates in from somewhere else, and it was a lot easier than splitting the components up with a proper call.

Carelessness
At the time I did this, I knew that I was not doing it the "right" way. But it was a way that would work fine. I justified this by telling myself that the data wasn't the point of the demo (the point was to show data templates and value converters). I told myself that no one who downloaded the code would care about this.

But I wasn't thinking ahead.

Carelessness Compounded by Laziness
Over the next 6 years, I would write many more demo applications. And because I'm a lazy developer, I used exactly the same data set for all of them. This was great for me because regardless of the presentation I was giving, the data would look familiar.

from I'll Get Back to You: Task, Await, and Asynchronous Methods

The look of my applications has changed, but the data has not.

The laziness is good. That means that I didn't need to come up with a new data set for each new demo. I could use what I already had. The bad part was that I was re-using careless code, and that would come back to bite me.

Going International
I think another reason I didn't worry about my careless code is because I never dreamed that my demos would leave the US. But those demos did start to go international -- primarily through Pluralsight and my YouTube channel. That's when things started breaking down.

My code:


Only works if someone is using the US date/time format: MM/dd/yyyy. And that's a problem because most of the world uses a format that makes much more sense: dd/MM/yyyy or yyyy/MM/dd.

The code above will throw an exception in either of these scenarios because it will be treating "17" as the month -- and there is no 17th month.

Some options to fix this include setting a specific culture or date format. But it was better to get rid of the ambiguity by using the constructor for DateTime:


This will work regardless of culture because the constructor parameters are clearly defined as year, month, day.

The updated GetPeople method looks like this:


Tendrils Everywhere
So the fix is pretty easy, but by this time, the bad code was *everywhere* -- in my samples for generics, delegates, lambda expressions, interfaces, design patterns, dependency injection, ugh. When I put my code samples together, I have to goal of someone being able to unzip the download and then build and run the code without having to do anything special.
This means that a copy of the careless code is included in pretty much every single downloadable project that I have.
I have been slowly updating the projects as I can. And I make sure that any new projects have the good code. But the fixes are tedious, and I'm still working on getting code updated.

Most of my code on GitHub is good, but there are still a lot of zip files on my website that are not. I'll get there eventually.

Watch Out for Carelessness
I cut a corner 6 years ago. I knew I was cutting a corner. I knew that there was a better way of doing things. But I made a careless decision that was short-sighted. I wish I could go back and fix it. It would save me a lot of work if I could. But that's how we learn.

I embrace my laziness as a developer. I let my tools do most of the work for me. I embrace unit testing. I look for ways to automate tedious work. These are all ultimately good results.

But I need to watch out for carelessness. I don't want to cut corners that will cause me pain in the future. If the solution feels "wrong", it probably is.

Embrace laziness, but watch out for carelessness.

Happy Coding!

Tuesday, November 24, 2015

Unit Testing Comparison Videos

In my presentation "Unit Testing Makes Me Faster", I show a couple of videos that compare manual testing and unit testing. Folks have asked me to make these videos available, but they don't really make sense without context. So, we're going to look at both here.

The Method
Here's the method that we have in our code that needs to be tested:


The particulars aren't important. This method checks to see if a credit card number passes the Luhn algorithm -- basically a checksum on a credit card number. We need to make sure that this method works.

If you want to look at the code for this, you can get it here: Unit Testing Makes Me Faster.

Manual Testing
Before I started unit testing, I would commonly throw together a tester application just to sanity check the algorithm. This would be a simple application with some input/output fields and a button.

In this case, I built a little WPF application (since WPF is my UI of choice these days). This application just takes a few minutes to build, and we end up with something that looks like this:


The code-behind for the button calls our method and puts the results in an output block:


To use this application, we paste our test numbers into the text box, click the button, and then check the output. This will tell us whether the "PassesLuhnCheck" method returns true or false:


Unit Testing
Building unit tests for this method is pretty simple. We just create a method to check for "true" results and a method to check for "false" results. To make things easier, we can parameterize the methods so that we can check multiple numbers.

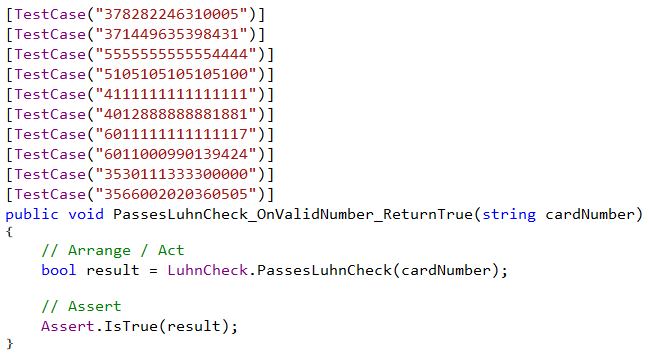
Here's our check for the numbers that should pass the Luhn check (and thus return "true"):


Because we're using parameterized tests, we can check 10 different cases with this one method.

For more information on parameterized tests, see Parameterized Tests with NUnit.

We can do the same for the numbers that should not pass the Luhn check:


This gives us 5 more test cases that should all return "false".

Build Comparison
And this takes us to the comparison videos. In the first video, we show side-by-side building the tester application and implementing the unit tests. This starts from scratch (File -> New Project) for both options.

So that we don't have to wait too long, this video is sped up 3 times faster than normal:


Direct video link: Side-By-Side Test Build

What this shows is that when we're comfortable with our tools, it takes about the same amount of time to build either test solution -- about 5 minutes in this case.

There is a big caveat there: when we're comfortable with our tools.

In my case, I am comfortable with WPF XAML and with unit testing using NUnit. If I did not know WPF, then I would expect that building the tester application would take me a bit longer. In the same way, if I were new to unit testing and NUnit, I would expect that building the unit tests would take me a bit longer.

But if I'm comfortable in both environments, then we get a fair comparison between these solutions.

The build times may be similar, but we see a real difference when we look at regression testing.

Regression Comparison
Regression testing is when we make sure that we didn't break any existing functionality in the code. It's a bit hard to tell in the above video, but we do have some failing tests. If the input contains a non-numeric (such as a letter or a minus sign), then the method we're testing throws an exception.

Our job is to fix the method so that our tests will pass (without throwing exceptions), and then we need to go back and check that we didn't break the existing functionality.

This video shows a side-by-side comparison of fixing the problem and then running regression tests. This video is *not* sped up; it is real time:


Direct video link: Side-By-Side Regression Test

This is where we see a huge difference. With our unit tests in place, after we make the change to our code, we simply build and re-run the tests. The tests take 3 seconds to run. We get confirmation that our changes fixed the problem and also that we didn't break the existing functionality.

For the manual test application, we need to go through our test cases and copy/paste them into the application and click the button. This only takes about a minute to do. But even so, it's painful to watch. If you watch closely, you'll see that the unit tests are complete before we have a chance to check the first value manually.

The real question is which type of regression are we most likely to do? If the tests run automatically in 3 seconds, then I'm going to be running those tests all day long. If I have to go through a manual process of copy/paste and clicking, then I'm never going to do that.

Wrap Up
Doing side-by-side comparisons of various testing methods can give us a good idea of where the advantages lie. Granted, it takes time to get up-to-speed on unit testing, but that's no different from any other framework. And there are many other advantages to having automated tests in place as well. Check out the materials for some more information: Unit Testing Makes Me Faster.

Happy Coding!

Saturday, November 21, 2015

Fixing an NUnit Version Mismatch

Sometimes demos don't always go according to plan.

For those of you who were at Live! 360 this past week, I had a little trouble when I was showing how "easy" it is to get NUnit working in Visual Studio. Normally it is easy -- in fact, it's just as easy as this: Integrating NUnit into the Visual Studio Test Explorer.

But these steps did not work for me this past Wednesday. I added both NuGet packages, but the tests did not show up in the test explorer. Fortunately, I had a working solution that I prepared earlier, so we were able to continue with the demo.

The answer to the problem turned out to be pretty simple, but it wasn't something I could troubleshoot on the fly.

[Update 3/4/2016: A demonstration of installing NUnit in Visual Studio 2015 (including dealing with the current version mismatch) is available by watching a few minutes of this TDD video: TDD Bascis @ 3:30.]

[Update 04/20/2016: The 3.0 version of the Test Adapter has just been released. When using NUnit 3.0, be sure to use the "NUnit3TestAdapater" package from NuGet. When using NUnit 2.0, use the "NUnitTestAdapter" package from NuGet. More information here: Integrating NUnit into Visual Studio - Update for NUnit 3]

Version Mismatch
I suspected I might run into a problem when I saw the icons in NuGet:


I needed to add the first and third packages from this list. I noticed that the top one (the NUnit testing framework) had a new icon. And it didn't match the NUnitTestAdapter (the part that plugs into the Visual Studio Test Runner).

During the demo, I just hoped for the best. Unfortunately, this didn't work out so well.

Further Investigation
After the demo, I did some further investigation and found that the version numbers were, in fact, different.

NUnit framework version 3.0.0

NUnit test adapter version 2.0.0

NUnit 3.0 was *just* released. Unfortunately, the test adapter for version 3.0 had not yet been released (CTP 7 was available when I looked into this).

The Working Version
So one question is why did my pre-built version of the project work? Well, the NuGet packages that were saved off with the project were both for the 2.0 release of NUnit. Here's a screenshot from the video that shows the side-by-side build:

Previous NuGet packages showing 2.0 icons
This has the icons that I was expecting to see on Wednesday. Since I didn't refresh my NuGet packages, I kept using the versions previously downloaded, and everything worked as expected.

As a reminder, you can see the videos and get other materials from the presentation on my website: Unit Testing Makes Me Faster.

Starting from Scratch
So the next question is how would we follow along with this sample if we wanted to start from scratch? The answer is that we just need to get the previous version of NUnit from NuGet.

In addition to the "Install" option in NuGet, we also have the option to "Downgrade":

Downgrade to Prior NUnit version

When we do this, we can select the latest 2.0 version (2.6.4) or another version from the drop-down. If we install the 2.6.4 version of NUnit with the 2.0.0 version of the Test Adapter, then everything works as expected.

[Note: The latest NuGet package manager does not have a specific "Downgrade" option. Instead, you just pick the version you want from the "Version" drop-down, then click the "Install" or "Update" button.]

(An alternate solution is to get the pre-release version of the Test Adapter, but I don't normally use pre-release software. I like for other folks to shake out the bugs a bit first.)

This is a short-term problem. Hopefully in the very near future, the 3.0.0 version of the Test Adapter will be released, and we can go back to doing things the easy way.

Wrap Up
Things don't always go as we expect. And that's okay. But we should take the time to review what happened, try to figure out the core issue, and put steps in place to make sure it doesn't happen again.

In my case, I have another demo project that has the skeleton of the testing library. In that project, the NuGet packages for NUnit have already been included in the project. That means they don't need to download live, and we know that the version we have will work for the presentation. I actually already had this project so that I could still run this demo without a live internet connection, but I decided to take the chance at Live! 360 since I had good network access.

I had a great time presenting at Live! 360, and I'll look forward to coming back and doing it again.

Happy Coding!