Wednesday, January 22, 2020

Building a Web Front-End to Show Mazes in ASP.NET Core MVC

Recently, I showed a web application that displays generated mazes (Generating Mazes in a Browser).


Here's how I built it and why.

Note: I'm not pretending that this is anything amazing. But I'm not often in the web front-end world, so this was a bit of a challenge for me. In addition, I realized that I was able to put this web application together relatively quickly because I understood the conventions of ASP.NET MVC; I'll be going into detail about those conventions in a later article.

Update Feb 2020: The later article is now available: The Secret Code: ASP.NET MVC Conventions.

Code samples are available on GitHub: jeremybytes/mazes-for-programmers.

The Existing Application
Previously, I wrote some C# code to generate mazes based on the book Mazes for Programmers by Jamis Buck (Amazon link).

The result was a console application that generated text output and graphical output.


If you look closely, you will find that these outputs represent the same maze.

You can run this code yourself by running the "DrawMaze" project from the GitHub repo mentioned above.

Shortcomings
The shortcomings of the application can be seen in the Main method of the Program.cs file (from the Program.cs file in the DrawMaze project):


The Main method creates a MazeGenerator object and passes in a ColorGrid (that represents the maze grid itself) and a RecursiveBacktracker -- this is the maze algorithm that will be used.

But there are more algorithms to use. Here's the listing from the "Algorithms" project in Visual Studio (also in the Algorithms project on GitHub):


One of the main things I wanted to do was to see the differences in the algorithms. Some are biased along a diagonal, some generate longer paths, some generate twistier paths. For more information on the algorithms themselves, take a look at the articles listed in the README on GitHub.
To switch to a different algorithm with the console application, I had to recompile the application. The same is true for changing the size and color of the maze.
In addition, the current implementation is not cross-platform due to the way the graphical maze is displayed. See this article for an explanation of that: Converting .NET Framework to .NET Core -- UseShellExecute has a Different Default Value.

Solution
  • Cross-Platform: A browser-based solution would fix my cross-platform problem. Instead of saving the output to a file, I would stream it to a web page. This would work on any supported platform that has a web browser.
  • Parameters: A query string on the web page would allow me to change the algorithm, size, and color by changing the URL (no recompiling).
  • Parameter Selection: A page with data entry fields would eliminate the need to craft a query string for parameters.
I've had some experience with ASP.NET MVC, so I was confident that I could get this working.

False Starts and Missteps
I had several false starts and missteps along the way. For example, I started with using the "ASP.NET Core MVC" template on a new project. I got the basics working, but then everything fell apart when I tried to add parameters.

Then I tried starting with the "Empty ASP.NET Core" template. I got the site working (meaning, I could stream the image to the browser and even collect the parameters), but it was a bit of a mess since the template did not include any pages that I could start with for parameter collection.

So I ended up taking what I learned from the "empty" project and starting over again with the "MVC" project. I got that project working (mostly) as I want it to, so that's where things are today.

I won't go into those details here. That's something you'd get from watching a Twitch stream (and I move too slowly to make a Twitch stream interesting). I mainly wanted to get across that things don't work out the first time, and there's often fumbling and frustration involved.

Adding a MazeController
In the web application, I added a MazeController class. With the default routing that is set up in ASP.NET Core MVC, this means that I could navigate to "https://{base-address}/maze" to get to the page.

Again, I will cover this default routing scheme in an upcoming article.

Update Feb 2020: The later article is now available: The Secret Code: ASP.NET MVC Conventions.

Getting a Bitmap of the Maze
What I needed was a bitmap of the maze to stream back to the browser. Let's go back and look at the "Program.cs" file from the console application (from the Program.cs file in the DrawMaze project):


Above, we saw the MazeGenerator object. But we need to see how that is used. This is in the CreateAndShowMaze method (also in the Program.cs file in the DrawMaze project):


This calls "GenerateMaze" on the MazeGenerator.

"GetTextMaze" returns a string that represents the maze in text format.

"GetGraphicaMaze" returns a bitmap. This is the thing that we actually need.

It seems strange to have "GenerateMaze" as a separate step, but this gives us better control over when a new maze is generated so that we can display the same maze in different output formats. As a side note, if you call either of the "Get" methods when a maze has not already been generated, it will automatically generate the maze.

Extracting Things Out
For the "MazeController", I needed to have a "MazeGenerator" to work with. In the original code, the "MazeGenerator" was part of the console application project. So I moved the "MazeGenerator" class (and the "IMazeGenerator" interface) into a separate class library. This way, I could reference it from the console application and the web application. This code is in the "MazeGeneration" project on GitHub.

The Initial MazeController
Now back to the MazeController class. We can use most of the same code as the console application. This code is in the MazeController.cs file in the GitHub project.

Note that the code on GitHub is a bit more complex than what we will see in this section because it includes the parameters.

Here is the initial "Index" method:


Using the default routing in ASP.NET Core MVC, if we navigate to "https://{base-address}/maze", the "Index" method on the "MazeController" class will be called. This method returns an IActionResult. The IActionResult can be a variety of things. We'll talk about that a bit more in an upcoming article.

This method has 3 steps. (1) it generates the bitmap image that we want to return, (2) it changes the bitmap into a byte array, (3) it returns that byte array with a content type. The result of the last 2 steps is to stream an image file back to the browser (I stole this code from the internet).

The "File" that we use here is not a file on the file system that we think about normally. This a method in ControllerBase that returns a "FileContentResult". Again, we won't go into those details here, but stay tuned for another article.

Here is the code from the "Generate" method (again, it will look a bit different in the GitHub repo):


This is the same code that we had in the console application. It creates an instance of the MazeGenerator and then calls "GetGraphicalMaze".

The "ConvertToByteArray" method turns our image into a byte array that we can use for streaming:


This uses a MemoryStream to save the image to a byte array. In this case, we are using the "PNG" format for the image.

Just Enough Code
This is just enough code to get a result. We can run the web application and navigate to "https://localhost:5001/maze" and get the following result:


Success!

I was pretty excited when I got this to work. It's a small step (particularly to developers who do this all the time), but it was something new for me.

Now that I had the basics working, I could work on adding parameters.

Adding Parameters
For the parameters, I take advantage of some of the magical auto-wiring that happens with ASP.NET Core MVC.

To start with, I added parameters to the "Generate" method (this is the final method from the MazeController.cs file):


This lets us pass in the size, algorithm, and color.

Note that color is a "MazeColor". This is an enumeration with the valid values in it. Due to some weirdness in the way the colors are generated, there are a limited number that we can choose from (at least for now -- I might spend some time changing this).

The "MazeColor" enum is in the "ColorGrid.cs" file in the MazeGrid project:


The values are White (default), Teal, Purple, Mustard, Rust, Green (more of a pea green), and Blue.

The Size Parameter
We'll add parameters to the "Index" method one at a time so we can see how this works. Here's an updated "Index" method with a "size" parameter added (this is not the final version of the MazeController.cs file in MazeWeb):


In this method, we created some default values for the new parameters of the "Generate" method. The size defaults to 15, the algorithm to the Recursive Backtracker, and the color to purple.

But we also added a "size" parameter to the Index method. And this is where things get fun.
ASP.NET Core MVC tries to fill in parameters however it can. 
It will check query strings, form values, and routes to see if it can find a matching value. If it finds something it can use, it fills it in; otherwise, it leaves the default.

So here, we're looking for a "size" value. If it doesn't exist, then our parameter will be the default value for an integer (which is 0). In the body of the method, we check to see if the "size" parameter has a value greater than 0. If it does, then we use it; otherwise we use the value of "15".

Setting Size with a Query String
Let's try things out. First, we'll use the same URL that we did before: https://localhost:5001/maze


This uses the default size of "15" (and we can see it is smaller than the default "20" size that we had earlier).

But we can add a query string to set the size: https://localhost:5001/maze?size=75


And now we can see that we can set the size to whatever we want.

Setting the Color
Next, we'll set the color. For this, we'll add another parameter to the Index method (again, this is not the final version of the MazeController.cs file in MazeWeb):


Here we added a "MazeColor" parameter to the method. Notice also that we got rid of our variable that was set to purple.

Let's see how the page behaves now. First, we'll pass in "Green" using this URL: https://localhost:5001/maze?size=50&color=Green


Even though the type is an enumeration, the ASP.NET Core MVC infrastructure does a good job at parsing the parameter. It figured out that even though we're passing in a "string" as part of the query string, it converted that to the correct value of the enum.

But what if we pick something that doesn't match up, like pink? Let's try it: https://localhost:5001/maze?size=50&color=Pink


This gives us no color at all. Well technically, the selection is "White". Notice in the enumeration that we showed earlier, that "White" is set to the value "0". Enums are integers underneath. So if ASP.NET Core MVC cannot parse the parameter (or find it at all), then it uses the default value for that type. In the case of integers (and enums) that value is "0". The result is that we end up with a "White" grid.

If we were to leave the parameter off completely, then we would also get a white grid.

Setting the Algorithm
The last parameter is the algorithm. I saved this for last since it is the most complex. Here is the final code for the "Index" method (this is the one that you'll find in the MazeController.cs file in the MazeWeb project):


The "algo" parameter has been added as a string type. That makes things a little more complicated since the "Generate" method needs an instantiated object that implements the "IMazeAlgorithm" interface.

Let's walk through the middle part of the code.

First, we still have the "algorithm" variable that is set to a "RecursiveBacktracker". We need to keep this in case we are unable to parse the parameter.

Next, we have an "if" statement to see if the parameter is empty. If it is empty, then we will use our default.

If it is not empty, then we will use reflection to try to load an object from an assembly. In this case, all of the maze algorithms are in the same assembly (the Algorithms project).

The first line in the "if" block loads the assembly that the "RecursiveBacktracker" is in. This gives us access to all of the algorithms in that assembly.

Next, we use the "GetType" method on the assembly to try to locate the algorithm. The first parameter of the "GetType" method is the fully-qualified type name. So we want something like "Algorithms.RecursiveBacktracker". We don't expect someone to pass in the namespace ("Algorithms") as part of the query string, so we add it on here.

The second parameter of "GetType" is whether we want an error to throw an exception. In our case, we'll say "no exceptions".

The third parameter of "GetType" is case-insensitivity. The "true" value means case doesn't matter. I primarily set this because when I was testing I kept typing "SideWinder" instead of "Sidewinder".

If we can find the type successfully (meaning the "algo" variable is not null), then we use the Activator to create an instance of the type. The "CreateInstance" method returns "object", so we need to cast it to the "IMazeAlgorithm" interface. By using the "as" operator, we will not get an exception if the cast fails. If it fails, we get "null".

In looking at this code, I need a bit more safety built in (in case we end up with a null). It's not too big of a worry since the only types in the assembly are algorithms that implement IMazeAlgorithm. But it probably should be hardened up a bit.

By the way, I know these things about Assembly.GetType because I've been looking into that method as well as Type.GetType and how assemblies are loaded in another set of articles: Using Type.GetType with .NET Core & Type.GetType Functionality has not Changed in .NET Core. Plus, I've been working on a follow-up.

Setting the Algorithm
So let's try this. Let's try the "BinaryTree" algorithm: https://localhost:5001/maze?size=30&color=Blue&algo=BinaryTree


The Binary Tree algorithm has a strong diagonal bias (meaning it tends to create diagonal paths through the center of the maze). So we can see that this algorithm is working.

Here's another using "HuntAndKill": https://localhost:5001/maze?size=30&color=Blue&algo=HuntAndKill


This tends to create long paths.

Better Parameter Collection
So things are working. But it is a bit fiddly. Right now, someone needs to know how to create a query string with the right values to use this. It would be much better if we could collect parameters.

And that's what I did. I modified the "Index.cshtml" file for the "Home" view. You can see the file on GitHub: Index.cshtml file in the "Views/Home" folder.

I won't walk through all of the details, but let's hit some highlights. If you're not familiar with ASP.NET Core MVC, I'll cover these bits in more detail in the upcoming article mentioned above.

First, let's look at the "form" element that was added to the page:


The "action" tells us that this is the same as navigating to "/maze" (which is what we have been doing manually). This has the effect of posting the values in the form back to the MazeController.

Before we look at the contents of the form, notice the "@model" at the top of the page. Here is the "MazeModel" object mentioned there (from the MazeModel.cs file in the Models folder):


This is a set of properties that represent the parameters that we need for the web page.

Since these are part of the model, we can create UI elements for them fairly easily. Here are the "Size" and "Color" parameters in the form (from the Index.cshtml file in the Views/Home folder):


The "Html.TextBoxFor" method creates a text box for the "Size" property in the model. (The "@Value" part is supposed to set a default for that field, but it's not working right -- there's still more work to do).

The "Html.DropDownListFor" method creates a drop-down list for the Colors. Here we can match up the value the user sees (the "Text") with the value that we pass to the controller ("Value"). In this case, the text and the value are the same.

The biggest advantage that we get from the drop-down list is that we have a selection of valid values to choose from. No more putting in "Pink" and getting unexpected results.

Things are similar for the algorithm selection:


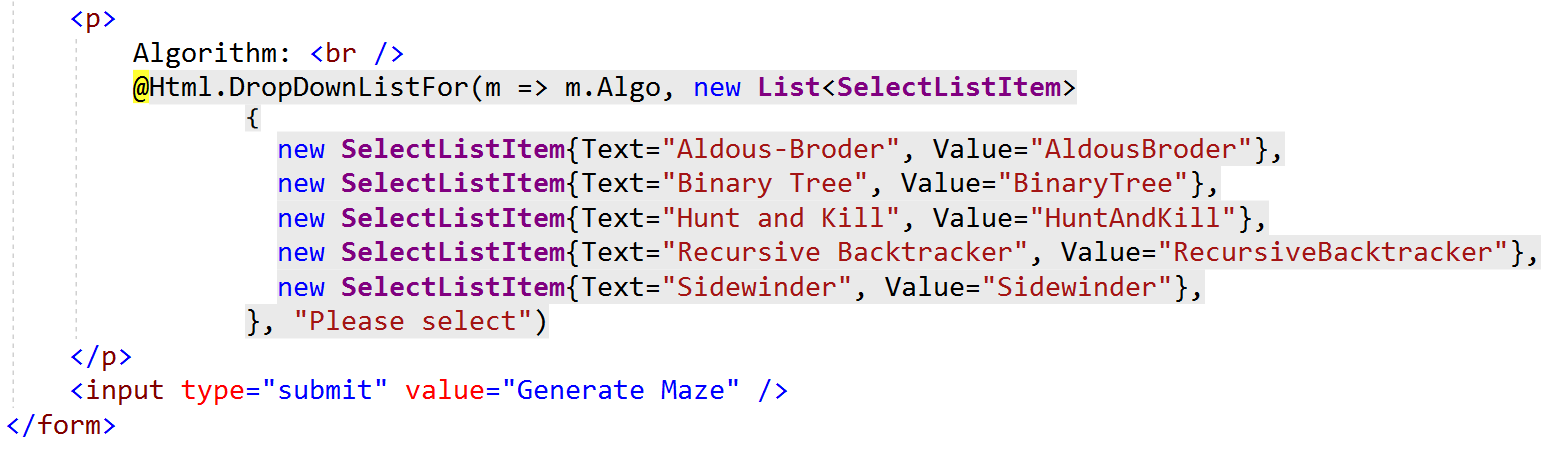
In this case, the text and values are a little different. The good part is that we know what the valid values are, and we also don't need to worry about typing in things just right.

This is enough to get our parameter collection screen working.


And now it's really easy to run mazes of different sizes in different colors using different algorithms!

Don't forget that you can get the final code on GitHub: jeremybytes/mazes-for-programmers.

How Does It Work?
How does the controller get the parameters? If we look at the address box in the browser, they aren't being sent as a query string. Since the "form" is set up as a "post", the form data is posted to the MazeController. As mentioned earlier, ASP.NET Core MVC is really good at figuring out parameters on controller methods.

It looks in the form data and finds values that match up with the parameters. The parameter names are not exactly the same (the case is different for one thing). But the infrastructure is able to figure everything out. It's pretty cool once you get used to it.

Hitting Goals
After all this, did I hit the goals for this project?

Cross-Platform?
Yes! I confirmed the solution works on macOS. Here's a screenshot of it running locally using Safari:


One note about a problem I ran into: The first time I ran the application, I got a GDI+ runtime error, specifically about a missing dll. Fortunately, a quick search came up with this articile: SOLVED: System.Drawing .NETCore on Mac, GDIPlus Exception.

The solution is to install the GDI+ mono library. On macOS, this is easy to install with "brew install mono-libgdiplus". Check the article for more details.

Update March 2020: For Ubuntu (and other Linux distributions that use apt-get), you can get the GDI+ library with "apt-get install libgdiplus". I found out about this while putting together a Docker image to run this application.

Parameters?
Yes! The application has parameters for maze size, color, and algorithm. Putting together a query string in the right format allows this to be changed quickly.

Parameter Selection?
Yes! Even though parameters are available, using a query string is a bit brittle. It is easy to get wrong and hard to know which values are valid. The parameter web page gives us easy access to the available parameter values and makes things much less brittle.

Overall, I hit the problems that I was trying to solve with this approach.

Wrap Up
As mentioned, this isn't groundbreaking. But I had fun doing it. There's still a few things to fix. I haven't figured out how to get default values into my parameter form. I've tried a few things (including the current code that we saw above), but haven't had luck so far.

In addition, rather than streaming back a file that takes up a whole page, it would be interesting to stream back the file to another page (I actually had that working, but couldn't figure out how to do the parameters). So I'll be pulling this out from time to time.

And I owe you another article as well. I spent a few hours putting this website together (even with the problems that I ran into). I realize that the reason I was able to put it together so quickly is that I know the conventions of ASP.NET Core MVC, in particular how the controllers and views hook up, how the default routing works, how query string parameters get to controller methods, and how form data gets to controller methods. I'll go through all of these things in a future article.

Update Feb 2020: An article about conventions is now available: The Secret Code: ASP.NET MVC Conventions.

Happy Coding!

Monday, January 20, 2020

Generating Mazes in a Browser

When the serious coding stuff gets too serious, I take a break and do something fun. This time, it's going back to my Mazes for Programmers project -- GitHub: https://github.com/jeremybytes/mazes-for-programmers.

This is a project based on code from the book Mazes for Programmers by Jamis Buck (Amazon link). I took the samples from the book (which are in Ruby) and made a C# project. You can see the articles listed on the README.md for the GitHub project.


Update: This article is about running the application. If you want to see how I built it, check out this article: Building a Web Front-End to Show Mazes in ASP.NET Core MVC.

Moving to .NET Core
The last time I wrote about this, I was working on converting the project to .NET Core (read about a bit of that here: Converting .NET Framework to .NET Core -- UseShellExecute has a Different Default Value).

I managed to get the code working, but I wasn't happy with the solution. The application is a console application, but it uses a shell execute to display the bitmap version of the maze when it is done. In the prior article, I mention how this is fine for Windows, but there is not really a good cross-platform solution to this.

When I picked up the code this time, I decided to make a browser-based version. This should be friendly to macOS and Linux systems as well.

Showing a Maze in a Browser
I won't go into the code here (I'm planning a more detailed article to walk through that part), I just want to show what's new in the GitHub repo (jeremybytes/mazes-for-programmers) in case you want to take a look at the projects yourself.

Preview of the code: The bitmaps are generated in memory and streamed to the browser. I know it's not groundbreaking, but it's something I had never done before.

Running the "MazeWeb" project gives us a parameter page:


This gives options for selecting the size of the maze (the value of "50" will give a 50 by 50 grid). In addition, there are drop-downs to select the color and maze algorithm.

I particularly like these options because it makes it easier to generate mazes to see the differences in the algorithms (and the colors are fun, too).

Here's the output for the selected parameters: 50, Purple, Recursive Backtracker:


And another sample:


This uses the values 150, Mustard, and Aldous-Broder. (You can look at the prior articles to see the differences in the algorithms.)

As a warning, the larger values take longer to generate. If you go over 200, then you may be waiting several minutes for it to complete. I've done some benchmarking, and the delay seems to be in the creation of the bitmap image, not in the generation of the maze itself.


Also, the bitmaps can be a bit large. Notice in the browser tab that the image is 4500x4500. When I saved off this particular file, it was about 2 MB. Here's the full image that you can zoom in on to see the detail:


Running the Project
This project uses .NET Core 3.1, so you'll need that version of .NET installed. You can run the web application through the command line or with Visual Studio 2019.

Running from Visual Studio
If you open the project in Visual Studio 2019, you'll want to change the drop-down on the "Start Debugging" button so that it runs the right way.

First, make sure that "MazeWeb" is set as the startup project. Then in the toolbar, click the drop-down for the "Start Debugging" button (the green triangle) -- it's a bit hard to see; I didn't know it was there for a long time.


Make sure that "MazeWeb" is selected. If "IIS Express" is selected (which is the default), then Visual Studio will try to run the web application under IIS Express, and this won't work. If you select "MazeWeb", then Visual Studio will use the self-hosted Kestrel environment (the same one you get running from the command line).

With this setting changed, you can click the button (or hit F5), and the debugger will start, the website will be started from the command line, and the browser will navigate to the parameter page.

You may be prompted to install / trust a developer certificate. This is so that you can use HTTPS against the "localhost" environment.

Running from the Command Line
You can also run the website from the command line. Open a PowerShell (or cmd) window and navigate to the "MazeWeb" project folder:


Once you're at the "MazeWeb" folder, type "dotnet run" to start the website.

Notice that it says "Now listening on: https://localhost:5001". If you navigate your browser to that address, you'll find the parameter page. You may be prompted to install / trust a certificate for HTTPS. This is normal for the development environment.

More to Come
There's still a little more work to be done on this project. I'm currently unsuccessful in getting default values into the parameter page, and I think there are some inefficiencies with the bitmap generation.

I haven't been active in web programming for a while, so there was a bit of fumbling through the process of getting this running. I'll be putting down those thoughts soon.

Find some joy and frivolity from time to time. It's too easy to get bogged down in frustrations.

I might spend the rest of the day generating mazes in different colors.

Happy Coding!

Monday, January 13, 2020

Type.GetType Functionality Has Not Changed in .NET Core

In the last article, I talked about how the behavior of Type.GetType() has changed between .NET Framework and .NET Core. This is incorrect.
The behavior of Type.GetType() is the same; it is the runtime behavior that is different.
As I mentioned in that article, "the fastest way to get a right answer is to post a wrong one". And that worked here. An anonymous commenter posted a good description of what is happening (unfortunately they posted anonymously so I'm unable to give them credit where it is due).

Assembly Loading
The confusion comes from the my interpretation of the word "loading" in the documentation.

Here is part of the "Remarks" section that was quoted in the last article (link to doc: https://docs.microsoft.com/en-us/dotnet/api/system.type.gettype?view=netcore-3.1#System_Type_GetType_System_String_):


"You can use the GetType method to obtain a Type object for a type in another assembly if you know it's assembly-qualified name, which can be obtained from AssemblyQualifiedName. GetType causes loading of the assembly specified in typeName." (emphasis mine)
In this context, "loading" refers to loading the assembly into the context, not "loading" the assembly from the file system.

The difference really has to do with how assembly resolution works. I am not an expert in these details, so I won't go into them. The bottom line is that assembly resolution works differently in .NET Core compared to .NET Framework.

In either runtime, Type.GetType() causes the assembly to be loaded into the context. The difference in behavior that we see in the example from the previous article is due to assembly resolution and how assemblies are found on the file system.

I will be looking into the details to see how to make sense out of them.

The Recommended Solution
The "recommended" solution is to create a custom assembly load context so that you can handle this resolution yourself in any way you choose.

This approach is shown in the tutorial mentioned in the previous article: Create a .NET Core application with plugins.

This solution is a bit of overkill for my scenario. I don't really need a "plugin" architecture for this application. I need a dynamic loading solution. There will only be one data reader used by the application; which one is used is determined at runtime.

One reason to use a custom assembly context is to isolate the data reader dependencies from the rest of the application. If the data reader and main application need different versions of the same DLL, then loading everything into the same context will not work.

I will put together another version of this project using the plugin architecture, and we can look at the differences and benefits.

Update Jan 2020: Here is the article that describes using a custom assembly load context: Dynamically Loading Types in .NET Core with a Custom Assembly Load Context.

Frustration
My frustration regarding changes in C# and .NET Core are increasing rather than decreasing.

I am a big fan of .NET Core. I like the simpler approach, the more understandable templates, the cross-platform functionality, the runtime speed, and many other things.

For the most part, when converting applications between .NET Framework and .NET Core, things just work. But when things don't work, it is extremely frustrating to find what went wrong.

Previously I wrote about a change to UseShellExecute that cause an unexpected delay in converting an application. I spent a bit of time simply locating the thing that changed.

In this case, I knew that the assembly loading had changed in .NET Core. I knew that it was possible to load assemblies in a way that makes it easy to unload them. I also knew that it was possible to load multiple versions of the same assembly using these new features. What I did not know was that the default behavior had changed.

In the code-space, Type.GetType() appeared to be the problem. But the real problem was deeper than that. GetType is *technically* working the same. But the overall behavior is different.

I Am Not an Expert
I started this blog in February 2009 with the statement "I am not an expert." That has not changed. I have a bit of programming experience. And I've written lots of applications that make users happy. I also like to think that I'm always looking for ways to improve and expand my knowledge and experience.

My blog, speaking, and videos are all there to share what I've learned -- passing on a technique that helped me understand a subject. Occasionally someone leaves a comment like the following:
"Speaking now in 2020, I can really see how video likes generate more likes. This (and the video before it) are by FAR the best resource for Lambda & LINQ that I have managed [to] find." [Source]
This is from a video on lambda expressions and LINQ that was published in 2015, and it is encouraging that people still find the information useful. That's why I continue.
Unfortunately, over the past couple years, I feel that Microsoft and .NET are leaving the non-experts behind. More and more features and changes require the .NET programmer to become an expert whether they like it or not.
This is discouraging to me since I am on a mission to help the non-expert programmer. That mission is not to create experts; it is to create programmers who can quickly and efficiently make their users happy. You should not need to be an expert to do that.

It's easy to say "just don't use the new features", but that is not always possible. Even if you do not use the new features, you need to understand them. That's because the sample code and tutorials that you find online use these features.

A big reason I've spent so much time trying to make lambda expressions understandable is not because I want people to use lambda expressions (although they are certainly free to). The reason I teach people about lambda expressions is because so many online samples use them. So even if you do not use them in your own code, you need to understand them so that these samples make sense.

With the changes to the frameworks and the languages (in particular Interfaces in C# 8), there is a lot to keep up with. Of the over 50 changes made to the C# language over the last few years, many developers are familiar with 2 or 3 of the more popular ones.

I have spoken with quite a few developers over the past year who do not know what .NET Standard is or why it is important. Some people would say these are bad developers, but I disagree. Many are developers who are focused on getting solutions to users. Some have said "We're not doing cross-platform so we don't care about .NET Core [and .NET Standard]". It's an unfortunately common misconception, and it results from not having enough information to understand the real impact of these things as we move forward to .NET 5.

I'm not advocating that the development environment should be frozen; just that we should take time to understand the impact of the changes that we're making. Like every technology, there are pros and cons. We need to make sure that the benefits are worth it and that we are not leaving a big part of the developer landscape behind.

If we are spending our time retooling and converting applications, when will we have time to actually deliver solutions to our users?

Bringing It Back Around
That was a bit of rant there. It is something that has been weighing on me for a while. And I don't like to point out problems without having a solution.

In this case, I'm going to keep learning, keep moving forward. And when I come across roadblocks, I will find ways around them. And you will be the first to hear about those solutions, even if it is an acknowledged hack or workaround. And when someone points out a better solution, I will pass that along as well.

I'm not ready to give up at this point; hopefully you aren't either.

Sunday, January 5, 2020

Using Type.GetType with .NET Core / Dynamically Loading .NET Standard Assemblies in .NET Core

The Type.GetType() method lets us load a type from the file system at runtime without needing compile time references. Because of the way that assemblies are loaded in .NET Core, this behaves differently than it did in .NET Framework.

Update Jan 13, 2020: The Type.GetType() method has not changed, but runtime behavior regarding assembly loading has changed. That doesn't negate the workaround shown here, so feel free to keep reading. For more information see the next article: Type.GetType() Functionality Has Not Changed in .NET Core.

Short Version
In .NET Framework, calling Type.GetType() with an assembly-qualified name...
  • Loads the specified assembly from the file system
    Note: "from the file system" is observed behavior, but technically not correct -- see the followup article mentioned above for more details. 
  • Returns a Type object
In .NET Core, calling Type.GetType() with an assembly-qualified name...
  • Does *NOT* load the specified assembly from the file system
  • If the assembly is not already loaded, GetType() returns null
  • If the assembly is already loaded, GetType() returns the Type object
This means that we need to take extra steps in .NET Core in order to use Type.GetType() with .NET Core applications. And things get more interesting if we are loading .NET Standard assemblies.

Note: The code for this article comes from my talk on C# interfaces (IEnumerable, ISaveable, IDontGetIt: Understanding .NET Interfaces). The code is in 2 separate GitHub repositories. The .NET Framework code is at GitHub: jeremybytes/understanding-interfaces. The .NET Core code is at GitHub: jeremybytes/understanding-interfaces-core30.
In the spirit of "the fastest way to get a right answer is to post a wrong one", I'm putting down my thought processes in solving an issue. If there is an easier way (such as setting a flag or adding a config setting), please let me know in the comments.
Why Dynamically Load Types?
I have used dynamic loading of types for 2 primary scenarios: (1) swapping one set of functionality for another, and (2) plugging in business rules. In either of these scenarios, we do not need to have the specifics of the dynamically loaded types available at compile time. Things can be figured out at run time.

In the first scenario (and the code sample we'll look at today), I have changed out data-access code from one system to another. For example, to get data from a SQL database, a web service, or some other location. This is particularly helpful when there are multiple clients using the same application with different data storage systems.

In the second scenario, I deployed an application with the option of adding or changing certain business rules at a later time. The business rules follow a specific interface and are stored in a separate assembly (or multiple assemblies). At runtime, the application loads the business rules from the file system. This made it easy to update existing rules, add rules, or remove rules without needing to recompile or redeploy the application; only the business rule files were affected by updates.

Dynamic Loading with .NET Framework
I ran across this issue when I was moving a WPF application from .NET Framework 4.7 to .NET Core 3.0. We'll start with code from the .NET Framework repository mentioned above (GitHub: jeremybytes/understanding-interfaces), specifically the "completed" code in the "04-DynamicLoading" project (completed/04-DynamicLoading).

This application dynamically loads a data repository that can get data from a text file (comman-separate values (CSV)), a web service (HTTP/JSON), or a SQL database (SQLite local db). The application does not know anything about these data repositories at compile-time. Instead, it loads a repository from the file system based on configuration.

Here is the code that dynamically loads the repository (from the RepositoryFactory.cs in the PeopleViewer project):


The "GetRepository" method returns IPersonRepository -- this is the interface that represents the data repository.

The first line of the method gets the assembly-qualified name from configuration. Here's the configuration section for the CSV Repository (from the App.config file of the PeopleViewer project):


This lists the assembly-qualified name for the repository. This consists of the following parts:
  • Fully-qualified Type Name: PersonRepository.CSV.CSVRepository
  • Assembly Name: PersonRepository.CSV (this is "PersonRepository.CSV.dll" on the file system)
  • Assembly Version: 1.0.0.0
  • Assembly Culture -- this is used for localization (which we haven't implemented here)
  • Assembly Public Key Token -- this is used for strongly-named assemblies (which we haven't implemented here)
The next line in our method makes a call to Type.GetType() with this assembly-qualified name. GetType will find the assembly on the file system (by default, it looks in the same folder as the executable). Then it loads the assembly and pulls out the information for the Type object.

Activator.CreateInstance will create an instance of the Type using a default constructor. In this case, it will be a CSVRepository.

The last 2 lines cast the new instance to the correct interface and return it.

Getting the Repository Assemblies
One other piece is that we need to get the CSVRepository assembly to the executable folder somehow. The project does not have any compile-time references to the assembly, so we need to do this manually.

We have the repositories (and all of their dependencies) in a folder at the solution level called "RepositoriesForBin" (you can look at the contents of RepositoriesForBin on GitHub). Here's a bit of a screenshot from Windows File Explorer:


This snippet shows the "PersonRepository.CSV.dll" file that we're using here. In addition, we have files for the web service repository, the SQL database repository, and all of the dependencies for those repositories.

To get these into the executable folder, the PeopleViewer project has a post-build step. (It's kind of buried in the PeopleViewer.csproj file on GitHub -- it's easier to look at this in the Visual Studio project properties). Here is the post-build section of the project properties:


This copies files from the from the "RepositoriesForBin" folder to the output folder (including any sub-folders).

For more information on build events, take a look at "Using Build Events in Visual Studio to Make Life Easier".

Running the Application
When we run the application, we get data using the CSV repository (which gets data from a text file on the file system).


Changing the Data Source
If you're curious about how the dynamic loading works. Shut down the application and open the executable file in File Explorer (this is in the PeopleViewer/bin/Debug folder).

Run "PeopleViewer.exe" by double-clicking it from File Explorer. You will see the same results as above.

Shut down the application, and then edit the "PeopleViewer.exe.config" file on the file system using your favorite text editor. Comment out the section for the "CSV Repository" and uncomment the section for "SQL Repository". Save and close the file.

Now when you re-run the application, it will use the SQL database instead of the text file.

In real life, we would not be doing this on a single machine. However, think of the scenario where we have multiple clients. For each client, we give them just the assemblies that they need for their particular environment. If a new client has a different data store, that's fine. We create a repository assembly and give it to that client. We do not need to recompile the application or deal with multiple versions deployed at different client sites.

Anyway, on to .NET Core.

Converting to .NET Core
For the .NET Framework project, the WPF application (PeopleViewer) is a WPF application. The web service (People.Service) is an ASP.NET Core 2.2 API. The interface project (PersonRepository.Interface) is a .NET Standard 2.0 project. All of the repository files are .NET Standard 2.0 as well.

Part of the reason for using .NET Standard project for many things is that I knew I would be moving the WPF application to .NET Core once .NET Core 3.0 was released. And that's what I did.

I moved the WPF application and the web service to .NET Core 3.0. And I moved the libraries (including the repositories) to .NET Standard 2.1.

One other thing I did with this application was change all references from "Repository" to "Reader". Since the operations for the repositories are read-only, the term "reader" is more appropriate.

The completed code is on GitHub (jeremybytes/understanding-interfaces-core30), specifically in the "completed/04-DynamicLoading" folder. Note that this repository has the completed code, so you won't be able to follow along with the interim code (you can contact me for details if you'd really like to follow along).

Broken Code in .NET Core
Unfortunately, if we take the "GetRepository" method (now called "GetReader") straight across, the code does not work.

If we run the application, we get an exception:


The "Activator.CreateInstance" method is giving us an ArgumentNullException. This means that the "readerType" variable that we have here is null.

"GetType" is not returning what we want. Here are the values of "readerTypeName" and the "readerType" in the debugger:


This shows that the "readerTypeName" variable is populated with the assembly-qualified name that we expect. So that's fine.

But the "readerType" that is returned from the GetType method is null.
GetType does not automatically load an assembly in .NET Core like it does in .NET Framework.
Frustration and Reasoning
This is where I went through a bit of frustration. When checking the documentation for "GetType", there is currently (as of Jan 5, 2020) no indication that it works differently. Here is a screenshot of the beginning of the "Remarks" section for Type.GetType (link (which will hopefully be updated by the time you read this): https://docs.microsoft.com/en-us/dotnet/api/system.type.gettype?view=netcore-3.1#System_Type_GetType_System_String_):


Note that I do have ".NET Core 3.1" selected for the Version. Here is the start of the "Remarks" text:
"You can use the GetType method to obtain a Type object for a type in another assembly if you know its assembly-qualified name, which an be obtained from AssemblyQualifiedName. GetType causes loading of the assembly specified in typeName." (emphasis mine)
So, according to the documentation, this should work.

Assembly Loading and Unloading
The reason that this does not work is that the assembly loading mechanism was changed for .NET Core. This was done for a couple of reasons. First, we can set up different assembly load contexts; this lets us load different versions of assemblies into different contexts in the same application. This was not really possible before. Second, we can unload assemblies after we're done with them. Again, this is something that was very difficult to do before.

Manually Loading an Assembly
In getting this to work, my first step was to manually load the assembly by hard-coding the value. Here is the code for that.


Before calling the "GetType" method, this code loads the CSV assembly into the context using "AssemblyLoadContext.Default.LoadFromAssemblyPath". This will load the assembly into the default context (which is the main one that the application uses). The parameter is the assembly file name with the full path.

For the path, there is an assemblyPath variable that is set to the current location of the executable (AppDomain.CurrentDomain.BaseDirectory) with the file name appended (PersonReader.CSV.dll).

This gets us a working application:


But it is of limited usefulness since the CSV reader assembly is hard-coded.

A Different Approach
At this point, I figured that I could try to parse the file name out of the assembly-qualified name that we already have in the configuration file, or I could take a different approach.

When we manually load an assembly into the context like we did above, we also get a reference to that assembly. This means that instead of using "GetType" to locate a type, we can poke into the assembly directly using reflection.

For this approach, I made a few changes to configuration, output folders, and code.

Note: this is not the final version of the code, but you can find it by looking at a particular commit in GitHub: commit/49dc7a33d8071e9eef83d9e1a1d7bba5c3de50cb.

New Configuration
Rather than having the full assembly-qualified name of the type, I created settings for just the parts that I needed. Here is the new configuration (in the App.config file for the commit mentioned above):


Now we have a "ReaderAssembly" key with a value of "PersonReader.CSV.dll" -- the name of the file on the file system. We also have "ReaderType" which is "PersonReader.CSV.CSVReader" -- the fully-qualified name of the reader type.

New Output Folder
In addition, since we will no longer rely on "GetType" being able to find files in the executable folder, I decided to move the reader files to a separate sub-folder in the output. This makes it easier to keep track of the reader assemblies, particularly if we need to remove or change the files.

Along with the new output folder comes updated post-build steps. These are in the PeopleViewer.csproj file for the commit mentioned above. Here is the view from Visual Studio, which is a bit easier to read:


This has 2 copy steps. The first step copies files from the "AdditionalFiles" folder into the output folder. This folder contains the data files that are used by the readers, specifically People.txt (for the CSV reader) and People.db (for the SQL reader).

The next step copies files from the "ReaderAssemblies" folder to a "ReaderAssemblies" subfolder in the output. This contains the dlls for the readers along with the dependencies.

New Code
Along with the new configuration and output location, we have some new code to dynamically load the specified data reader. This is in the ReaderFactory.cs file for the commit mentioned above:


Let's walk through this code.

First we get the "ReaderAssembly" value from configuration. As a reminder, this is "PersonReader.CSV.dll".

Next, we create the full directory path to that file by taking the "BaseDirectory" (where the executable is), appending the new "ReaderAssemblies" subfolder, and then adding the name of the file.

As a side note, the "Path.DirectorySeparatorChar" will pick the correct character for the operating system. So in Windows, it will use the backslash; in Linux and macOS, it will use the forward slash.

Notice that after calling "LoadFromAssemblyPath", we store the return value as "readerAssembly". This is the assembly that we just loaded.

The next step is to get the "ReaderType" from configuration. As a reminder, this is "PersonReader.CSV.CSVReader".

Next we get the reader type out of the loaded assembly. This code uses a little bit of LINQ to reflect into the assembly. "ExportedTypes" is a collection of all of the publicly visible types that are in the assembly. In the query, we go through the types and try to find one that matches the value from configuration. If the type is not found, this method returns null.

The rest of the method is what we had before. Once we have the Type, we can use the Activator to create an instance, and then we cast it to the appropriate type.

Working Code (sort of)
This code seems like a good approach. We can use configuration to decide which assembly and type to load. And when we run the application, it works!


The CSV reader works just fine, but we run into a problem if we try to use one of the other reader types.

Let's update the configuration to use the web service reader. (In the App.config file for the commit mentioned above, comment out the CSV section and uncomment the Service section):


This sets the values for "ReaderAssembly" and "ReaderType" to "PersonReader.Service.dll" and "PersonReader.Service.ServiceReader" respectively.

Unfortunately, this breaks the application. If we run the application and click the button, we get an exception:


This is a "file not found" exception. And the details tell us that it is trying to load the assembly for Newtonsoft.Json version 12.0.0.0. The service reader has a dependency on Newtonsoft.Json.

That brings us to the next problem: loading dependencies.

Assembly Dependencies
In searching for a solution, I came across a tutorial about adding plugin support: Create a .NET Core application with plugins.

This tutorial addresses dependencies. Unfortunately, the described solution does not work for the current code. In the section "Plugin target framework recommendations" we see the following (screenshot and text in case it gets updated):


"Because plugin dependency loading uses the .deps.json file, there is a gotcha related to the plugin's target framework. Specifically, your plugins should target a runtime, such as .NET Core 3.0, instead of a version of .NET Standard. The .deps.json file is generated based on which framework the project targets, and since many .NET Standard-compatible packages ship reference assemblies for building against .NET Standard and implementation assemblies for specific runtimes, the .deps.json may not correctly see implementation assemblies, or it may grab the .NET Standard version of an assembly instead of the .NET Core version you expect." (emphasis mine)
This plugin solution relies on ".deps.json" files to resolve dependencies. And there's our first problem.

.deps.json
The .deps.json file has the dependencies for an assembly. For example, when we build the PeopleViewer application, we get the following output:


In addition to the PeopleViewer.exe (which calls PeopleViewer.dll), we also have PeopleViewer.deps.json. By looking inside this file, we can see the following:


This has a "dependencies" section that shows a dependency on "PersonReader.Interface" version 1.0.0. (This is the interface project that we saw above). Because this is included, that assembly can be loaded along with the PeopleViewer assembly.

But our data reader assemblies do not have .deps.json files:


These assemblies are .NET Standard assemblies. As noted in the plugin tutorial, the dependencies for .NET Standard assemblies cannot be generated without knowing what .NET environment it will be running under. For example, the service reader may need a different version of Newtonsoft.Json when run from .NET Framework compared to running in .NET Core.

Options
To go down the path of the sample plugin architecture, I would need to change the data reader projects to .NET Core from .NET Standard. That is not something that is always practical depending on how the projects are being used.

Additionally, the plugin architecture seemed to be quite a bit more than I needed for this application.

Since all of the reader assemblies and dependencies are in a separate folder, I can take a different path. Instead of trying to figure out how to get the dependencies to load automatically, I can just load them manually.

Manually Loading Assemblies
In the previous code, we manually loaded the one data reader assembly based on configuration. To load the dependencies, we will load all of the assemblies that are in the "ReaderAssemblies" folder.

Here is the code for a "LoadAllAssemblies' method (from the "ReaderFactory.cs" file for the commit mentioned above):


In the first line, we build the path to the "ReaderAssemblies" folder.

Next, "Directory.EnumerateFiles()" will give us an enumeration of all the file names that match our search criteria. In this case, we ask for all files that end with ".dll". Also, we only search the top folder (not any subfolders).

Then we use "foreach" to loop through all the file names and load them into the default context. If there are any files that can't be loaded, then we just skip them.

Assumption
This has the assumption that all of the .dlls in this folder are ones that we want to load. This is a bit easier to do since we have a separate folder. If the reader assemblies were still in the root folder (like we had initially), I would be much more reluctant to try this approach.

Working Code
To get the code working, we call "LoadAllReaderAssemblies" at the top of our factory method (from the "ReaderFactory.cs" file for the commit mentioned above):


And now the application works with the service data reader as well:


Note: If you run this application yourself, you will also need to start the service. To start the service, open a command prompt to the "People.Service" folder and type "dotnet run". For more information on .NET Core services, check out this tutorial: Get Comfortable with .NET Core and the CLI.

Duplicated Code
With the updated solution in place, we have some unnecessary code. Let's take another look at the "GetReader" method (same as above):


In this case, the reader assembly gets loaded twice. When we call "LoadAllReaderAssemblies", everything in that folder is loaded, including the one for the data reader.

Then the next lines are concerned about getting a reference to the "Assembly" object that represents the reader assembly. To do this, we end up loading the data reader assembly a second time.

Rethinking the Solution
Let's go back to the initial problem: Type.GetType() does not automatically load an assembly.

But we saw that it still works when we manually loaded the assembly. Remember this code?


When we manually loaded the "PersonReader.CSV.dll" assembly, GetType worked just fine.

Now that we are loading the reader assembly and all of its dependencies, we can go back to that solution.

Back to Square One
With a better understanding of what's going on, we can go back to where we were initially. We can take our original code and add "LoadAllReaderAssemblies" to the top. Here is that code (in the ReaderFactory.cs file in the final code):


With this, we also need to go back to the original configuration (from the App.config file in the final code):


After all of the assemblies are loaded, GetType returns the Type object that we expect, and the rest of the code works as expected.

Running the application with this configuration gets data from the CSV text file:


And we can change the configuration to use the service:


Wrap Up
So we took a bit of a roundabout way to get back to where we started. But we learned some things along the way.
  • With .NET Core, we need to explicitly load assemblies.
  • With dynamically-loaded .NET Standard assemblies, we need to explicitly load any dependencies.
There are also some things to look into further.
  • Using .NET Core (or other specific framework) projects gives us a .dep.json file that specifies dependencies.
Moving to .NET Core is pretty smooth for the most part. But there are things that pop up that can be frustrating. Eventually we'll have all of those things catalogued, and conversions will be easier.

Happy Coding!