Step 1 - Create a New Silverlight Application
First we'll create a new Silverlight application. In Visual Studio, create a New Project, and select the "Silverlight Application" template. I've called mine "SilverlightWithWCF", so that's what you'll see in a couple places throughout the post.
Visual Studio will prompt you with the following:
(Click image to enlarge)

We want to include a new ASP.NET Web Application Project, so we'll leave the defaults as-is. Other options include "ASP.NET Web Site" and possibly "ASP.NET MVC" (if you have the MVC bits installed). In addition to using the ASP.NET application as a test site for the Silverlight application, we will use it to host our WCF service.
Step 2 - Build the WCF Service
We'll add a new WCF Service at this point. Right-click on the Web Application project ("SilverlightWithService.Web" in my case), and choose "Add", then "New Item". Select the WCF Service. We'll name ours "PersonService.svc". See below:
(Click image to enlarge)

You'll notice that there are 2 options we could choose from: "WCF Service" or "Silverlight-enabled WCF Service". You might wonder why we didn't pick the Silverlight one. The answer is that I wanted to look at the standard WCF Service, so that you will know what to do if you already have an existing WCF Service that you want to hook into. I'll point out the difference below when we look at the Web.config file.
Step 2a - The WCF Service Contract
WCF Service consist of 3 main pieces: the Service Contract, the Service Implementation, and the Service Configuration. First, we'll look at the Service Contract.
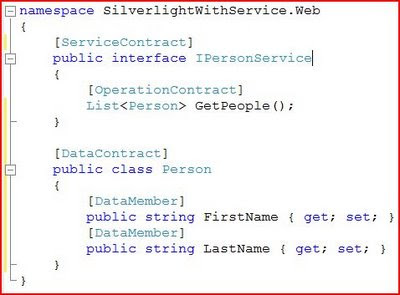
The contract is simply an interface decorated with a few specific attributes. Visual Studio will create an I[ServiceName].cs file that contains the placeholder contract. If you open the IPersonService.cs file, you'll see an interface that is decorated with the [ServiceContract] attribute. Visual Studio also gives you a sample method called "DoWork". You'll notice that this is decorated with the [OperationContract] attribute. You can think of this as being analogous to the [WebMethod] attribute that we used in ASMX Services. The [OperationContract] attribute denotes which methods will be exposed to the outside world.
We're going to replace the "DoWork" method with a "GetPeople" method. Take a look at the completed code below, and we'll step through it:
(Click image to enlarge)

You'll notice that our method returns a List of Person. Person is a custom class, and so we need to include the definition of the class as well. You'll notice that we have a separate public class called "Person" that is decorated with the [DataContract] attribute. The class consists of 2 public properties (FirstName and LastName) that are each decorated with the [DataMember] attribute. The DataContract and DataMember attributes let the WCF sub-system know that it needs to include this type in the definition of the Service.
On a side note, the [DataContract] and [DataMember] attributes can be excluded in this particular case. .NET 3.5 SP1 will automatically include the type definition for public classes that have automatic properties and a public default constructor. This was added to facilitate Entity Framework. I'll leave it as an exercise for the reader to do further research into this.
The contract only tells what the service will do, not how it does it. For that, we'll need to look at the service implementation.
Step 2b - The WCF Service Implementation
The WCF Service implementation is a class that implements the WCF interface. Open up the "PersonService.svc.cs" file (note: you can simply double-click on the "PersonService.svc", and it will open the .cs file).
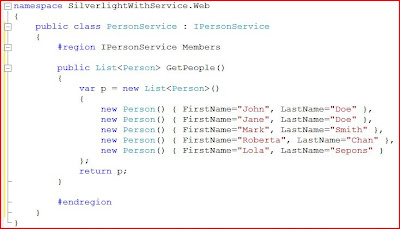
You'll see that the class "PersonService" implements "IPersonService" and still has the placeholder "DoWork" method from the stub that Visual Studio created. Delete this method. We'll let Visual Studio add the stubs for the updated interface. Simply right-click on "IPersonService" and select "Implement Interface", then "Implement Interface" again (we won't cover "Implement Interface Explicitly"). This will create a stub for the "GetPeople" method. Here's the implementation:
(Click to enlarge image)

This simply creates a List object and populates it with some Person instances. In real life, you'll probably be doing something more complex (such as accessing a database).
Next comes the configuration.
Step 2c - WCF Service Configuration
Open up the Web.config file, and then navigate to the "system.serviceModel" section (at the bottom). The only thing that you'll need to do is update the binding to "basicHttpBinding" (from "wsHttpBinding"). See below:
(Click image to enlarge)

Remember when I promised to show the difference between "WCF Service" and "Silverlight-enabled WCF Service"? This is it. Silverlight 2 is limited in that it can only use WCF Services that use the "basicHttpBinding". This is the same binding that ASMX services use. (Note: Silverlight 3 will not have this limitation). The "Silverlight-enabled WCF Service" defaults to basicHttpBinding, while "WCF Service" defaults to wsHttpBinding. If you have an existing service, you'll just need to change this value (or add an endpoint that uses this binding).
Note: This is a very important step. If you try to add a Service Reference in a Silverlight application to a WCF Service that is *not* using basicHttpBinding, then the proxy will not work. Even better, you don't get any helpful error messages, just a rather obscure one. So, make sure you don't skip this step.
From here, we'll build everything just to make sure that things look good. This completes our updates to the Web Application. Next, we'll move on to the Silverlight application.
Step 3 - Add the WCF Service Reference to the Silverlight Application
We'll start in the Silverlight application by adding a Service Reference to our newly created service. Right-click on the Silverlight Application project ("SilverlightWithService" in our case), and choose "Add Service Reference". If you click the "Discover" button, it will search out the Services that are included in the Solution. We'll use the namespace "PersonService". See below:
(Click image to enlarge)

Before you click "OK", be sure to check out the "Advanced" button. This opens a dialog that lets you choose how collections are returned from WCF Service calls:
(Click image to enlarge)

You'll see that there are 4 options to choose from: Array, Generic List, Collection, and ObservableCollection. The ObservableCollection is preferred in Silverlight for data binding purposes, but you may want to experiment with the other options as well. It doesn't matter the actual collection type that is returned from the service; it will be converted to the type you select here.
Now that we've added our Service Reference, we'll take a look at the Silverlight UI.
Step 4 - Update the XAML
Next, we'll create the UI. Open up the Page.xaml file. We're going to be making a few changes to the default values and adding some controls of our own. The final layout may look a little odd. This is because we will be adding some more elements to this in Part 2.
Here's the final layout:
(Click image to enlarge)

Let's look at the XAML; then we'll go through it step by step:
(Click image to enlarge)

First, update the Width and Height of the UserControl to 600 and 200 respectively. Then we'll swap out the "Grid" root element for a "Border". Then add a Grid with 3 columns (the other 2 columns will be used in Part 2). Inside the first column is a StackPanel with a ListBox and a Button. The ListBox sets the ItemsSource to "{Binding}". This says that each ListBox item will be bound to each item in the collection. The data binding will use a DataContext that we set in code at runtime.
Next is the Button named "EHButton" (for Event Handler Button -- Part 2 will have 2 additional Lists and Buttons and these names will make more sense). When adding an event handler in XAML, Visual Studio will help you out a bit. If you type "Click=" and hit Ctrl-Space (or let Intellisense pop up on its own), you will have the option "New Handler" to pick from. This will automatically name the handler based on the control name, and then add the stub to the code. In this case, it will create "EHButton_Click" in the code and hook up event.
Now that our UI is laid out, let's put the last of the pieces together.
Step 5 - Call the WCF Service
Here's another short-cut. If you right-click on "EHButton_Click" (the event handler) in the XAML, one of the options is "Navigate to Event Handler". This will open up the Page.xaml.cs file and put the cursor on the "EHButton_Click" event handler.
First, add the WCF Service namespace to the "using" section. This will make the code more readable. The namespace is [projectName].[serviceNamespace]. In our case, it is "SilverlightWithService.PersonService".
Now, we'll go back to the event handler. Start by creating a new proxy object. The proxy is the service name with "Client" appended to the end. In our case it is "PersonServiceClient". Next we'll hook up the callback. Since all Silverlight calls are asynchronous, we have to call the service asynchronously (it's the only choice). Start by hooking up an event handler to the "Completed" event. Visual Studio helps you out with this, too. Type "proxy.GetPeopleCompleted +=", and you'll see Intellisense for creating a new event handler. If you press "Tab" twice, it will create the new handler, and add the implementation. This is a great short-cut. The last step is to call the service using the "Async" method. In this case, just call "proxy.GetPeopleAsync()". See completed button click event handler below:
(Click image to enlarge)

The final step is to implement the callback. This is as simple as getting the result of the call (in this case a List of Person) with "e.Result" in the code. Then we assign this to the DataContext of the ListBox in the UI. One thing to note, if you hover over "e.Result", you will see that it is actually of type ObservableCollection of Person. This is due to the selection we made when we added the Service Reference earlier. The completed Page.xaml.cs file is as follows:
(Click image to enlarge)

Conclusion

